Git has a built in way to rebase all the way back to the beginning of
time. There is no need to scroll through the log to find the first
hash, or find the total number of commits. Just use --root.
git rebase --root
No themes match.
All posts with the tag "cli"
Git has a built in way to rebase all the way back to the beginning of
time. There is no need to scroll through the log to find the first
hash, or find the total number of commits. Just use --root.
git rebase --root
Git reflog can perform some serious magic in reviving your hard work from the dead if you happen to loose it.
You must git commit! If you never commit the file, git cannot help you. You might look into your trashcan, filesystem versions, onedrive, box, dropbox. If you have none of this, then you are probably hosed.
I really like to practice these techniques before I need to use them so that I understand how they work in a low stakes fashion. This helps me understand what I can and cannot do, and how to do it in a place that does not matter in any way at all.
This is what I did to revive a dropped docker-compose.yml file. The
idea is that if I can find the commit hash, I can cherry-pick it.
git init
touch readme.md
git add readme.md
git commit -m "add readme"
touch docker-compose.yml
git add docker-compose.yml
git commit -m "add docker-compose"
git reset 3cfc --hard
git reflog
# copy the hash of the commit with my docker-compose commit
git cherry-pick fd74df3
Here was the final reflog that shows all of my git actions. note I did reset twice.
❯ git reflog --name-only
0404b6a (HEAD -> main) HEAD@{0}: cherry-pick: add docker-compose
docker-compose.yml
3cfcab9 HEAD@{1}: reset: moving to 3cfc
readme.md
9175695 HEAD@{2}: cherry-pick: add docker-compose
docker-compose.yml
3cfcab9 HEAD@{3}: reset: moving to 3cfc
readme.md
fd74df3 HEAD@{4}: commit: add docker-compose
docker-compose.yml
3cfcab9 HEAD@{5}: reset: moving to HEAD
readme.md
3cfcab9 HEAD@{6}: commit (initial): add readme
readme.md
Right inside the git docs,
is states that the git reflog command runs git reflog show by default which
is an alias for git log -g --abbrev-commit --pretty=oneline
This epiphany deepens my understanding of git, and lets me understand that most
git log flags might also work with git log -g.
Here are some git commands for you to try out on your own that are all pretty similar, but vary in how much information they show.
# These show only first line of the commit message subject, the hash, and index
git reflog
git log -g --abbrev-commit --pretty=oneline

# similar to git log, this is a fully featured log with author, date, and full
# commit message
git log -g
If I am looking for a missing file, I might want to leverage --name-only or
--stat, to see where I might have hard reset that file, or deleted it.
git reflog --stat
git log -g --stat --abbrev-commit --pretty=oneline

git reflog --name-only
git log -g --name-only --abbrev-commit --pretty=oneline
Here is an example where I lost my docker-compose.yml file in a git reset,
and got it back by finding the commit hash with git reflog and cherry picked
it back.
❯ git reflog --name-only
0404b6a (HEAD -> main) HEAD@{0}: cherry-pick: add docker-compose
docker-compose.yml
3cfcab9 HEAD@{1}: reset: moving to 3cfc
readme.md
9175695 HEAD@{2}: cherry-pick: add docker-compose
docker-compose.yml
3cfcab9 HEAD@{3}: reset: moving to 3cfc
readme.md
fd74df3 HEAD@{4}: commit: add docker-compose
docker-compose.yml
3cfcab9 HEAD@{5}: reset: moving to HEAD
readme.md
3cfcab9 HEAD@{6}: commit (initial): add readme
readme.md
This just proves that its harder to remove something from git, than it is to get it back. It can feel impossible to get something back, but once its in, it feels even more impossible to get it out.
Reading eventbridge rules from the command line can be a total drag, pipe it into visidata to make it a breeze.
I just love when I start thinking through how to parse a bunch of json at the command line, maybe building out my own custom cli, then the solution is as simple as piping it into visidata. Which is a fantastic tui application that had a ton of vim-like keybindings and data features.
alias awsevents = aws events list-rules | visidata -f json
Anyone just starting out their vim customization journey is bound to run into this error.
E5520: <Cmd> mapping must end with <CR>
I’ll admit, in hindsight it’s very clear what this is trying to tell me, but for whatever reason I still did not understand it and I just used a : everywhere.
If you run :h <cmd> you will see a lot of reasons why you should do it, from
performance, to hygene, to ergonomics. You will also see another clear
statement about how to use <cmd>.
                                                          E5520
  <Cmd> commands must terminate, that is, they must be followed by <CR> in the
  {rhs} of the mapping definition.  Command-line mode is never entered.
You still need to map your remaps with a : if you do not close it with a
<cr>. This might be something like prefilling a command with a search term.
nnoremap <leader><leader>f :s/search/
If you can close the <cmd> with a <cr> the command do so. Your map will
automatically be silent, more ergonomic, performant, and all that good stuff.
nnoremap <leader><leader>f <cmd>s/search/Search/g<cr>
The default keybinding for copy-mode <prefix>-[ is one that is just so
awkward for me to hit that I end up not using it at all. I was on a
call with my buddy Nic this week and saw him just fluidly jump into
copy-mode in an effortless fashion, so I had to ask him for his
keybinding and it just made sense. Enter, that’s it. So I have addedt
his to my ~/.tmux.conf along with one for alt-enter and have found
myself using it way more so far.
To do this I just popped open my ~/.tmux.conf and added the following.
Now I can get to copy-mode with <prefix>-Enter which is control-b Enter, or alt-enter.
bind Enter copy-mode
bind -n M-Enter copy-mode
I have a full video on copy-mode you can find here.
A super useful tool when doing PR’s or checking your own work during a big
refactor is the silver searcher. Its a super fast command line based searching
tool. You just run ag "<search term>" to search for your search term. This
will list out every line of every file in any directory under your current
working directory that contains a match.
It’s often useful to need some extra context around the change. I recently
reviewed a bunch of PR’s that moved schema from save_args to the root of the
dataset in all yaml configs. To ensure they all made it to the top level
DataSet configuraion, and not underneath save_args. I can do a search for all
the schemas, and ensure that none of them are under save_args anymore.
ag "schema: " -A 12 -B 12
Creating a minimal config specifically for git commits has made running
git commit much more pleasant. It starts up Much faster, and has all
of the parts of my config that I use while making a git commit. The one
thing that I often use is autocomplete, for things coming from elsewhere
in the tmux session. For this cmpe-tmux specifically is super
helpful.
The other thing that is engrained into my muscle memory is jj
for escape. For that I went agead and added my settings and keymap
with no noticable performance hit.
Here is the config that has taken
~/.config/nvim/init-git.vim
source ~/.config/nvim/settings.vim
source ~/.config/nvim/keymap.vim
source ~/.config/nvim/git-plugins.vim
lua require'waylonwalker.cmp'
~/.config/nvim/git-plugins.vim
call plug#begin('~/.local/share/nvim/plugged')

" cmp
Plug 'hrsh7th/nvim-cmp'
Plug 'hrsh7th/cmp-nvim-lsp'
Plug 'hrsh7th/cmp-buffer'
Plug 'hrsh7th/cmp-path'
Plug 'hrsh7th/cmp-calc'
Plug 'andersevenrud/compe-tmux', { 'branch': 'cmp' }


call plug#end()
~/.gitconfig
[core]
    editor = nvim -u ~/.config/nvim/init-git.vim
stow -R --simulate -vvv git
Today I discovered a sweet new cli for compressing images. squoosh cli is a wasm powered cli that supports a bunch of formats that I would want to convert my website images to.
from the future
Unfortunately, due to a few people leaving the team, and staffing issues resulting from the current economic climate (ugh), I’m deprecating the CLI and libsquoosh parts of Squoosh. The web app will continue to be supported and improved. I know that sucks, but there simply isn’t the time & people to work on this. If anyone from the community wants to fork it, you have my blessing.
First the main feature of squoosh is a web app that makes your images smaller right in the browser, using the same wasm. It’s sweet! There is a really cool swiper to compare the output image with the original, and graphical dials to change your settings.
What is even cooler is that once you have settings you are happy with and are really cutting down those kb’s on your images, there is a copy cli command button! If you have npx (which you should if you have nodejs and npm) already installed it just works without installing anything more.
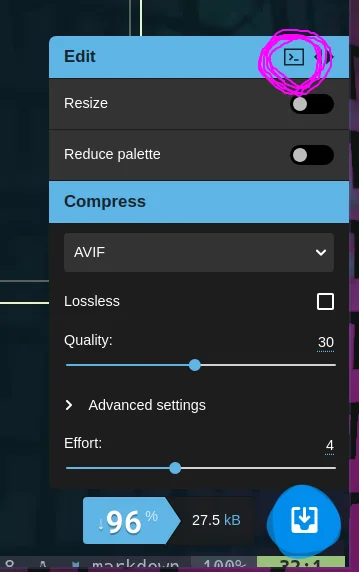
I copied the command that it gave me for converting to webp, and set it up to run on all of my pngs.
npx @squoosh/cli --webp \
  '{"quality":75 \
    "target_size":0 \
    "target_PSNR":0 \
    "method":4 \
    "sns_strength":50 \
    "filter_strength":60 \
    "filter_sharpness":0 \
    "filter_type":1 \
    "partitions":0 \
    "segments":4 \
    "pass":1 \
    "show_compressed":0 \
    "preprocessing":0 \
    "autofilter":0 \
    "partition_limit":0 \
    "alpha_compression":1 \
    "alpha_filtering":1 \
    "alpha_quality":100 \
    "lossless":0 \
    "exact":0 \
    "image_hint":0 \
    "emulate_jpeg_size":0 \
    "thread_level":0 \
    "low_memory":0 \
    "near_lossless":100 \
    "use_delta_palette":0 \
    "use_sharp_yuv":0 \
    }' \
    static/*.png -d squoosh-webp
I opened my images repo and converted all pngs to webp using the command above. I got 94% compression on my existing pngs without resizing anything. This is dang impressive, and not too hard to do. I do want to refactor my images site at some point and include this as part of the ci system.
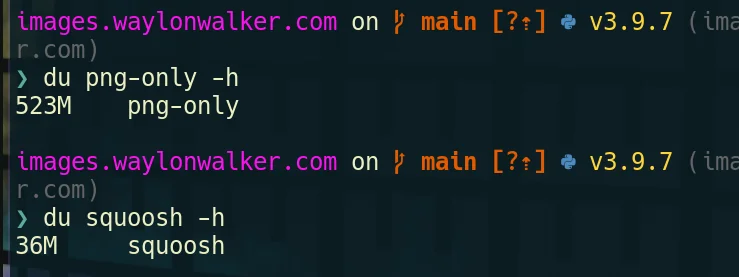
I also converted to avif, but it sent all my cpus to 100 for quite awhile, for only another 2MB total. Not sure if its worth it or not.
One of the first things I noticed broken in my terminal based workflow moving from Windows wsl to ubuntu was that my clipboard was all messed up and not working with my terminal apps. Luckily setting tmux and neovim to work with the system clipboard was much easier than it was on windows.
First off you need to get xclip if you don’t already have it provided by your
distro. I found it in the apt repositories. I have used it between Ubuntu
18.04 and 21.10 and they all work flawlessly for me.
I have tmux setup to automatically copy any selection I make to the clipboard
by setting the following in my ~/.tmux.conf. While I have neovim open I need
to be in insert mode for this to pick up.
# ~/tmux.conf
bind -T copy-mode-vi Enter send-keys -X copy-pipe-and-cancel "xclip -i -f -selection primary | xclip -i -selection clipboard"
bind-key -T copy-mode-vi MouseDragEnd1Pane send-keys -X copy-pipe-and-cancel "xclip -selection clipboard -i"
To get my yanks to go to the system clipboard in neovim, I just added unnamedplus to my existing clipboard variable.
# ~/.config/nvim/init.vim
set clipboard+=unnamedplus
If you need to copy something right from the terminal you can use xclip directly. I do this semi-often to send someone a message in chat.
cat file.txt | clip -sel copy
I set up some alias’s for doing this a bit more efficiently, but don’t find myself using them very often. This helps me grab commands from history and copy them.
alias hclip="history | tail -n1 | cut -c 8- | xclip -sel clip"
alias fclip="history -n 1000 | fzf | cut -c 8- | xclip -sel clip"
alias fclip="history -n 1000 | fzf | xclip -sel clip"
With the latest version of minecraft it requires a very new, possibly the latest, version of java. Lately we have been getting into modded minecraft and I maintain the server for us. It’s been tricky to say the least. One hurdle I recently hit involves having the wrong version of java.
I was getting this error trying to get a 1.12.2 forge server running.
Caused by: java.lang.ClassCastException: class jdk.internal.loader.ClassLoaders$AppClassLoader cannot be cast to class java.net.URLClassLoader (jdk.internal.loader.ClassLoaders$AppClassLoader and java.net.URLClassLoader are in module java.base of loader ‘bootstrap’)
In researching our errors, I found this on a forum.
Pre-1.13 Forge only works with Java 8.
I don’t write java, or really know how to manage different versions of java, but I have nixpkgs installed and it has a ton of odd stuff like this readily available, so searching nixpkgs landed me with this.
nix-env -iA nixpkgs.jdk8
once I had this installed I then just changed out java for the full path to my new nixpkgs.jdk8 java and it worked.
/home/walkers/.nix-profile/bin/java -server -Xms${MIN_RAM} -Xmx${MAX_RAM} ${JAVA_PARAMETERS} -jar ${SERVER_JAR} nogui
I don’t write java or do anything other than host minecraft servers wtih it. There is probably a better way of maintaining java versions than this, but this worked for me.
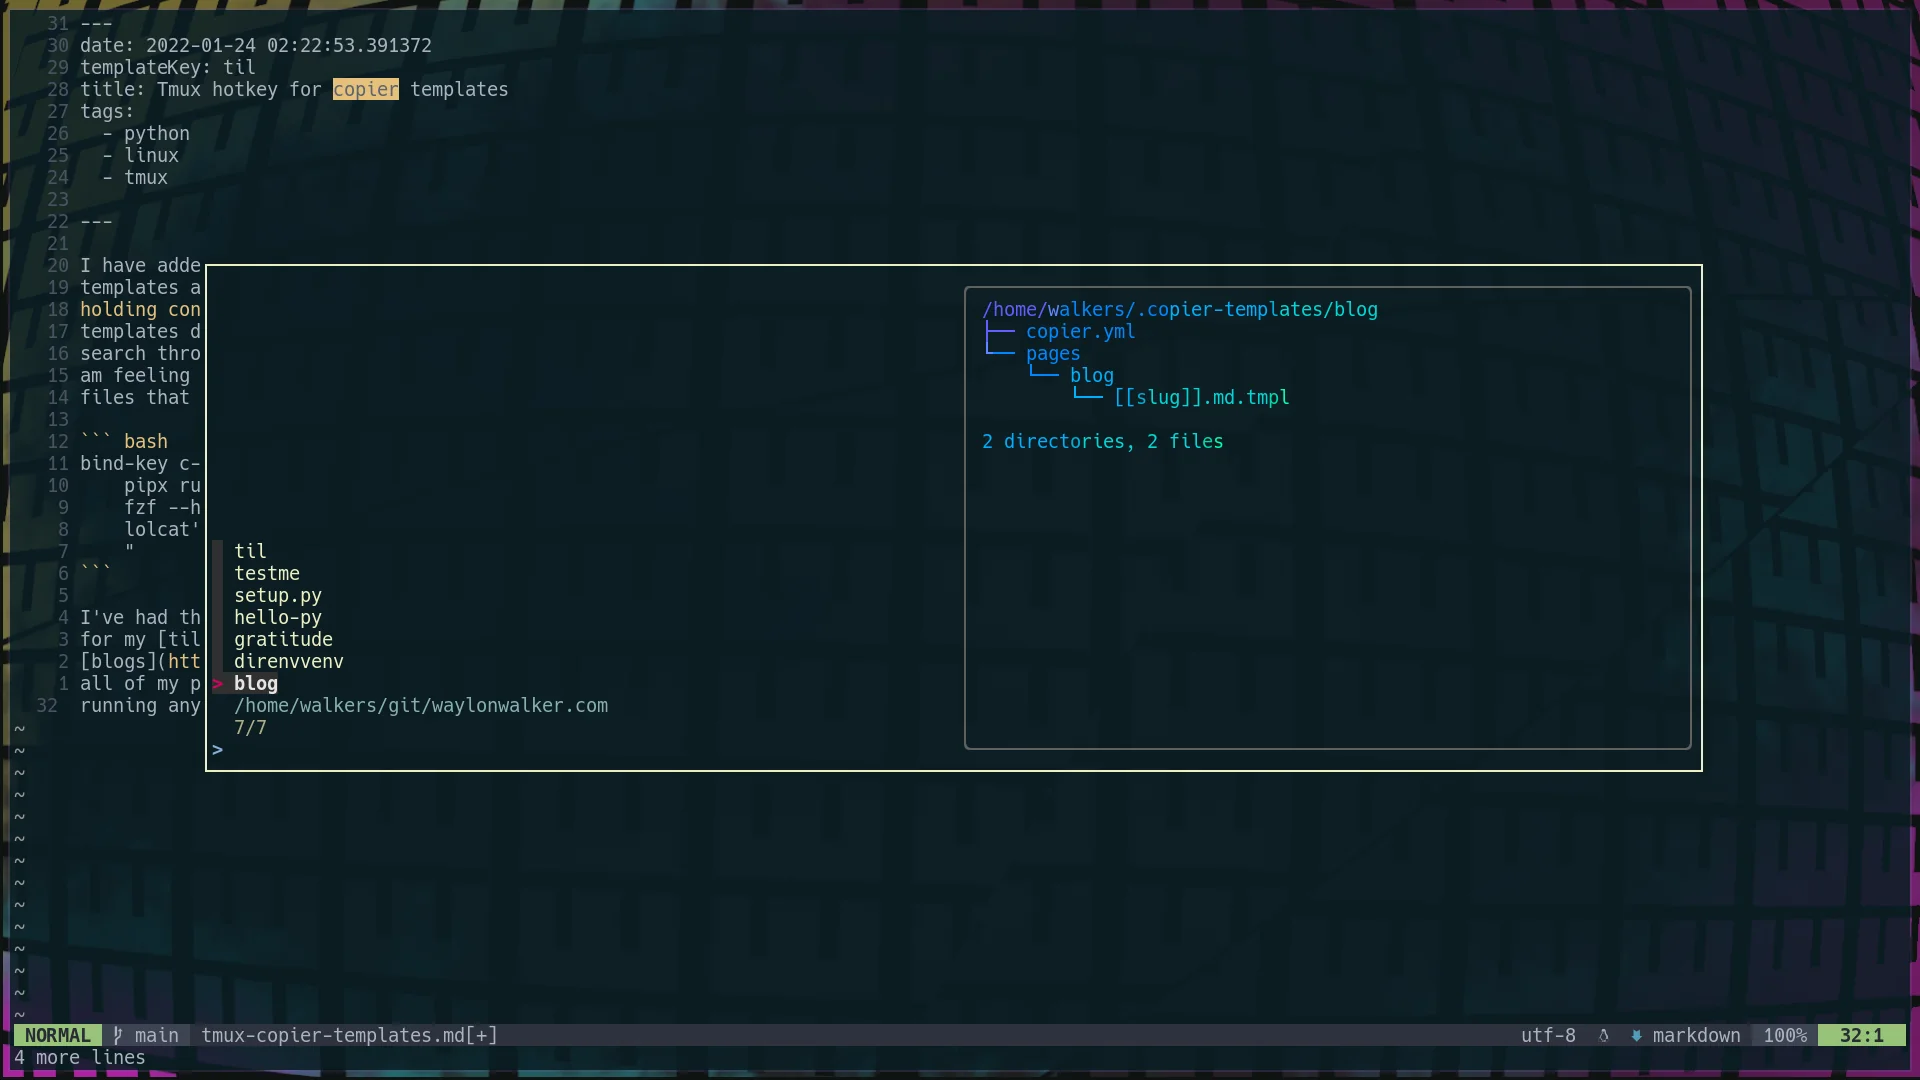
I have added a hotkey to my copier template setup to quickly access all my
templates at any time from tmux. At any point I can hit <c-b><c-b>, thats
holding control and hitting bb, and I will get a popup list of all of my
templates directory names. Its an fzf list, which means that I can fuzzy
search through it for the template I want, or arrow key to the one I want if I
am feeling insane. I even setup it up so that the preview is a list of the
files that come with the template in tree view.
bind-key c-b popup -E -w 80% -d '#{pane_current_path}' "\
    pipx run copier copy ~/.copier-templates/`ls ~/.copier-templates |\
    fzf --header $(pwd) --preview='tree ~/.copier-templates/{} |\
    lolcat'` . \
    "
I’ve had this on my systems for a few weeks now and I am constantly using it for my tils, blogs, and my .envrc file that goes into all of my projects to make sure that I have a virtual environment installed and running any time I open it.
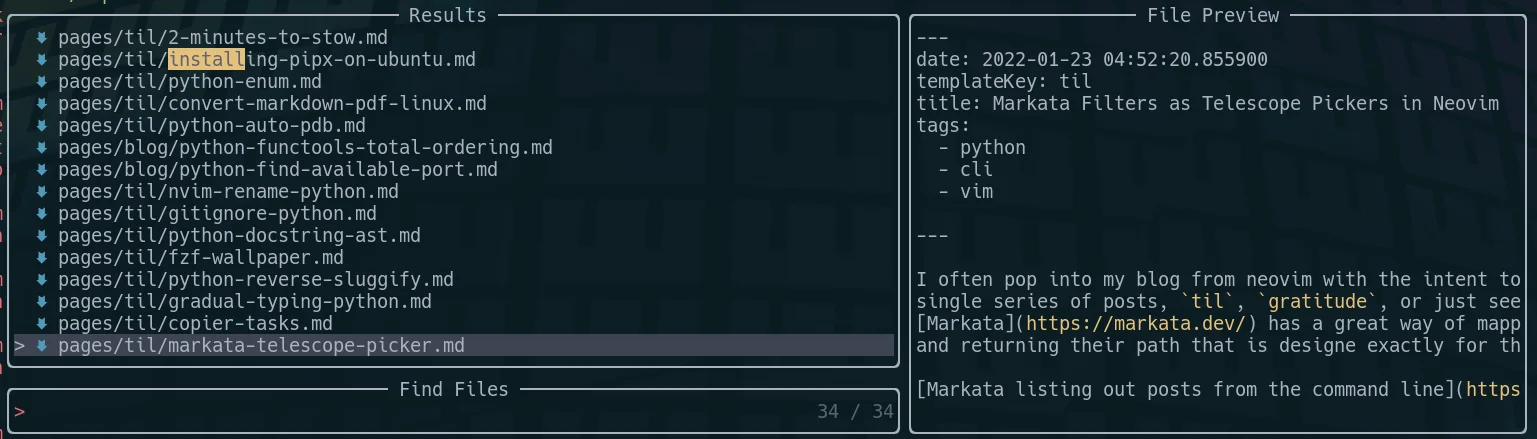
I often pop into my blog from neovim with the intent to look at just a
single series of posts, til, gratitude, or just see todays posts.
Markata has a great way of mapping over posts
and returning their path that is designe exactly for this use case.

To tie these into a Telescope picker you add the command as the
find_command, and comma separate the words of the command, with no
spaces. I did also --sort,date,--reverse in there so that the newest
posts are closest to the cursor.
nnoremap geit <cmd>Telescope find_files find_command=markata,list,--map,path,--filter,date==today<cr>
nnoremap geil <cmd>Telescope find_files find_command=markata,list,--map,path,--filter,templateKey=='til',--sort,date,--reverse<cr>
nnoremap geig <cmd>Telescope find_files find_command=markata,list,--map,path,--filter,templateKey=='gratitude',--sort,date,--reverse<cr>
NOTE telescope treates each word as a string, do not wrap an extra layer of quotes around your words, it gets messy.
Copier allows you to run post render tasks, just like cookiecutter. These are
defined as a list of tasks in your copier.yml. They are simply shell
commands to run.
The example I have below runs an update-gratitude bash script after the
copier template has been rendered.
# copier.yml
num: 128
_answers_file: .gratitude-copier-answers.yml
_tasks:
  - "update-gratitude"
I have put the script in ~/.local/bin so that I know it’s always on my
$PATH. It will reach back into the copier.yml and update the default
number.
#!/bin/bash
# ~/.local/bin/update-gratitude
current=`awk '{print $2}' ~/.copier-templates/gratitude/copier.yml | head -n 1`
new=`expr $current + 1`
echo $current
echo $new
sed -i "s/$current/$new/g" ~/.copier-templates/gratitude/copier.yml
I really appreciate that in linux anything can be scripted, including setting the wallpaper. So everytime I disconnect a monitor I can just rerun my script and fix my wallpaper without digging deep into the ui and fussing through a bunch of settings.
feh --bg-scale ~/.config/awesome/wallpaper/my_wallpaper.png
I set my default wallpaper with
fehusing the command above.
Leaning in on feh, we can use fzf to pick a wallpaper from a directory full of wallpapers with very few keystrokes.
alias wallpaper='ls ~/.config/awesome/wallpaper | fzf --preview="feh --bg-scale ~/.config/awesome/wallpaper/{}" | xargs -I {} feh --bg-scale ~/.config/awesome/wallpaper/{}'
I have mine alias’d to
wallpaperso that I can quickly run it from my terminal.
Converting markdown posts to pdf on ubuntu takes a few packages from the standard repos. I had to go through a few stack overflow posts, and nothing seemed to have all the fonts and packages that I needed to convert markdown, but this is what ended up working for me.
sudo apt install \
  pandoc \
  texlive-latex-base \
  texlive-fonts-recommended \
  texlive-extra-utils \
  texlive-latex-extra \
  texlive-xetex
# older versions of pandoc, I needed this one on ubuntu 18.04
pandoc pages/til/convert-markdown-pdf-linux.md -o convert-markdown-pdf.pdf --latex-engine=xelatex
# newer versions of pandoc, I needed this one on ubuntu 21.04
pandoc pages/til/convert-markdown-pdf-linux.md -o convert-markdown-pdf.pdf --pdf-engine=xelatex
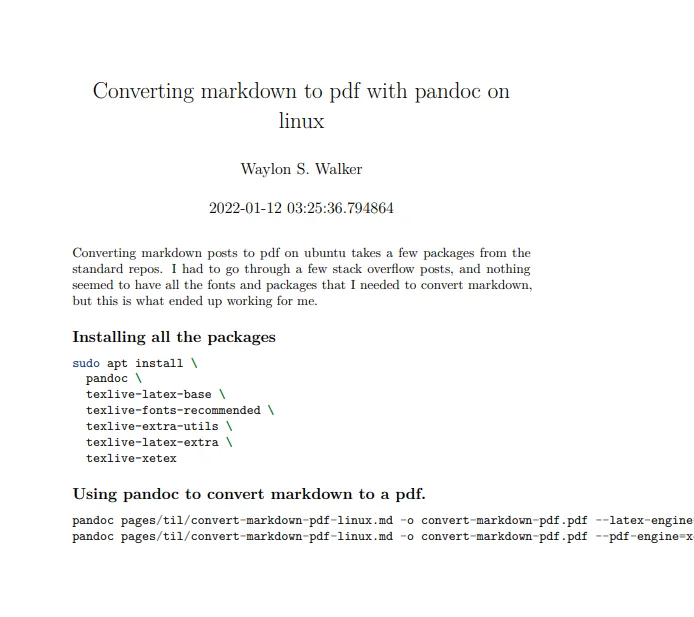
Here is an image of what converting this article over to a pdf looks like. The raw markdown is here.
I recently paired up with another dev running windows with Ubuntu running in wsl, and we had a bit of a stuggle to get our project off the ground because they were missing com system dependencies to get going.
Open up a terminal and get your required system dependencies using the apt package manager and the standard ubuntu repos.
sudo apt update
sudo apt upgrade
sudo apt install \
      python3-dev \
      python3-pip \
      python3-venv \
      python3-virtualenv
pip install pipx
I like running things like this through an ansible-playbook as it give me some extra control and repeatability next time I have a new machine to setup.
- hosts: localhost
  gather_facts: true
  become: true
  become_user: "{{ lookup('env', 'USER') }}"

  pre_tasks:
    - name: update repositories
      apt: update_cache=yes
      become_user: root
      changed_when: False
  vars:
    user: "{{ ansible_user_id }}"
  tasks:
    - name: Install System Packages 1 (terminal)
      become_user: root
      apt:
        name:
          - build-essential
          - python3-dev
          - python3-pip
          - python3-venv
          - python3-virtualenv
    - name: check is pipx installed
      shell: command -v pipx
      register: pipx_exists
      ignore_errors: yes

    - name: pipx
      when: pipx_exists is failed
      pip:
        name: pipx
      tags:
        - pipx
Here is a clip of me getting pipx running on ubuntu 21.10, and running a few of my favorite pipx commands.
Stow is an incredible way to manage your dotfiles. It works by managing symlinks between your dotfiles directory and the rest of the system. You can then make your dotfiles directory a git repo and have it version controlled. In my honest opinion, when I was trying to get started the docs straight into deep detail of things I frankly don’t really care about and jumped right over how to use it.
When using stow its easiest to keep your dotfiles directory (you may name it what you want) in your home directory, with application directories inside of it.
Then each application directory should reflet the same diretory structure as you want in your home directory.
Here is a simple example with my zshrc.
mkdir ~/dotfiles
cd ~/dotfiles
mkdir zsh
mv ~/.zshrc zsh
stow --simulate zsh
You can pass in the –simulate if you wish, it will tell you if there are going to be any more errors or not, but it wont give much more than that.
WARNING: in simulation mode so not modifying filesystem.
Once your ready you can stow your zsh application.
stow zsh
A slightly more complicated example is neovim since its diretory structure does not put configuration files directly in your home directory, but rather at a deeper level.
mkdir ~/dotfiles/nvim/.config/nvim/ -p
cd ~/dotfiles
mv ~/.config/nvim/ ~/dotfiles/nvim/.config/nvim/
stow zsh
!notice how the nvim directory inside of dotfiles is structured like it would be in your $HOME directory.
The copier answers file is a key component to making your templates re-runnable. Let’s look at the example for my setup.py.
❯ tree ~/.copier-templates/setup.py
/home/walkers/.copier-templates/setup.py
├── [[ _copier_conf.answers_file ]].tmpl
├── copier.yml
├── setup.cfg
└── setup.py.tmpl

0 directories, 4 files
Inside of my [[ _copier_conf.answers_file ]].tmpl file is this, a
message not to muck around with it, and the ansers in yaml form. The
first line is just a helper for the blog post.
# ~/.copier-templates/setup.py/\[\[\ _copier_conf.answers_file\ \]\].tmpl
# Changes here will be overwritten by Copier; NEVER EDIT MANUALLY
[[_copier_answers|to_nice_yaml]]
Inside my copier.yml I have setup my _answers_file to point to a special file. This is because this is not a whole projet template, but one just for a single file.
# copier.yml
# ...
_answers_file: .setup-py-copier-answers.yml
Once I change the _answers_file I was incredibly stuck
I’m making a library of personal copier templates in my
~/.copier-templates directory and I am going to run it from there.
copier copy ~/.copier-templates/setup.py
After rendering the template we have the following content in our
.setup.setup-py-copier-answers.yml file. This will allow us to update
quick if we ever change our template.
# .setup-py-copier-answers.yml
# Changes here will be overwritten by Copier; NEVER EDIT MANUALLY
_src_path: /home/walkers/.copier-templates/setup.py
author_github: waylonwalker
author_name: Waylon Walker
description: awesomeness
framework: null
keywords: null
package_name: my-package
This is where I was most stuck, primarily becuase -a <answers_file>
must come exactly after the base command copier. This felt a bit odd
to and not where I expected it so it.
copier -a .setup-py-copier-answers.yml update
So the defaults are now changed to our previous results, but it keeps
asking for them. To stop asking we can simply add a -f flag.
copier -fa .setup-py-copier-answers.yml update
Calendar data could not load. Try again.