Mermaid gives us a way to style nodes through the use of css, but rather than
using normal css selectors we need to use style <nodeid>. This also applies
to subgraphs, and we can use the name of the subgraph in place of the nodeid.
It’s also possible to specify subgraphs separate from where you define your
nodes. which allows for some different levels of grouping that would not be
possible if you were to define all your nodes inside of a subgraph.
graph TD;
    a --> A
    A --> B
    B --> C

    subgraph one
        A
        C
    end
graph TD;
a --> A
A --> B
B --> C
subgraph warehouse
    A
    C
end
Since GitHub started supporting mermaid in their markdown I wanted to
take another look at how to implement it on my site, I think it has some
very nice opportunities in teaching, documenting, and explaining things.
The docs kinda just jumped right into their mermaid language and really
went through that in a lot of depth, and skipped over how to implement
it yourself, turns out its pretty simple. You just write mermaid syntax
in a div with a class of mermaid on it!
<scriptsrc='https://unpkg.com/[email protected]/dist/mermaid.min.js'></script><divclass='mermaid'>graph TD;
a --> A
A --> B
B --> C
</div>
You just write mermaid syntax in a div with a class of mermaid on
it!
The above gets me this diagram.
graph TD;
a --> A
A --> B
B --> C
This feels so quick and easy to start getting some graphs up and running, but
does lead to layout shift and extra bytes down the pipe. The best solution in
my opionion would be to forgo the js and ship svg. That said, this is do dang
convenient I will be using it for some things.
In looking for a way to automatically generate descriptions for pages I
stumbled into a markdown ast in python. It allows me to go over the
markdown page and get only paragraph text. This will ignore headings,
blockquotes, and code fences.
It’s also super fast, previously I was rendering to html and using
beautifulsoup to get only the paragraphs. Using the commonmark ast was
about 5x faster on my site.
When I originally wrote this post, I did not realize at the time that
commonmark duplicates nodes. I still do not understand why, but I have had
success duplicating them based on the source position of the node with the
snippet below.
fromitertoolsimportcompressimportcommonmarkimportfrontmatterpost=frontmatter.load("post.md")parser=commonmark.Parser()ast=parser.parse(post.content)# find all paragraph nodesparagraph_nodes=[n[0]forninast.walker()ifn[0].t=="paragraph"andn[0].first_child.literalisnotNone]# for reasons unknown to me commonmark duplicates nodes, dedupe based on sourcepossourcepos=[p.sourceposforpinparagraph_nodes]# find first occurence of node based on source positionunique_mask=[sourcepos.index(s)==ifori,sinenumerate(sourcepos)]# deduplicate paragraph_nodes based on unique source positionunique_paragraph_nodes=list(compress(paragraph_nodes,unique_mask))paragraphs=" ".join([p.first_child.literalforpinunique_paragraph_nodes])
BeautifulSoup is a DOM like library for python. It’s quite useful to
manipulate html. Here is an example to find_all html headings. I stole
the regex from stack overflow, but who doesn’t.
Lets make a sample.html file with the following contents. It mainly has
some headings, <h1> and <h2> tags that I want to be able to find.
<!DOCTYPE html><htmllang="en"><body><h1>hello</h1><p>this is a paragraph</p><h2>second heading</h2><p>this is also a paragraph</p><h2>third heading</h2><p>this is the last paragraph</p></body></html>
I recently added a heading_link plugin to markata, you might notice the
🔗’s next to each heading on this page, that is powered by this exact
technique.
Today I discovered a sweet new cli for compressing images.
squoosh cli
is a wasm powered cli that supports a bunch of formats that I would want to
convert my website images to.
from the future
Unfortunately, due to a few people leaving the team, and staffing issues
resulting from the current economic climate (ugh), I’m deprecating the
CLI and libsquoosh parts of Squoosh. The web app will continue to be
supported and improved. I know that sucks, but there simply isn’t the
time & people to work on this. If anyone from the community wants to fork
it, you have my blessing.
First the main feature of squoosh is a web app that
makes your images smaller right in the browser, using the same wasm. It’s
sweet! There is a really cool swiper to compare the output image with the
original, and graphical dials to change your settings.
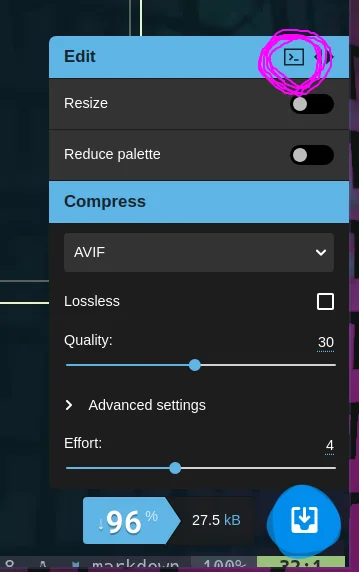
What is even cooler is that once you have settings you are happy with and are
really cutting down those kb’s on your images, there is a copy cli command
button! If you have npx (which you should if you have nodejs and npm) already
installed it just works without installing anything more.
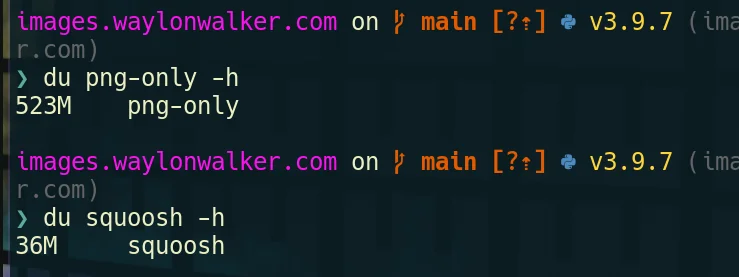
I opened my images repo and converted all pngs to webp using the command above.
I got 94% compression on my existing pngs without resizing anything. This is
dang impressive, and not too hard to do. I do want to refactor my images site
at some point and include this as part of the ci system.
I also converted to avif, but it sent all my cpus to 100 for quite awhile, for
only another 2MB total. Not sure if its worth it or not.
Draft Post I’ve really been digging @willmcgugan ’s rich library for creating TUI like interfaces in python. I’ve only recently started to take full advantage of it. Dev Server # I am working on a project in which I want to have a dev server running continuously in the background. I really like dev servers theat automatically chooose an unused port and list out the running pid so that I can kill it if I need to. automatic port number auto-restart display ( port, pid, uptime) finding the port # I am very novice at best when it comes to sockets, the following function came from searching StackOverflow for how to tell if a port is in use. I recursively check if a port is being used, if it is I increment by one until I find an unused port to return. The Dev Server # I am going super basic here and just running. It works for what I need it for, it hosts my files for the browser to display, and if I try a route without an index. html it gives me a decent file list. Optionally if you wanted a…
Recently I noticed a new netlify site of mine was down while I was checking to see if new content was live. Later found out this was consistent after each and every push the site would go gown as soon as I hit push, and would not come back until the build finished. Is this normal? # Do other Netlify sites go down during build??? Short Answer NO. All of my google fu lead me to believe I was alone and none of my other sites do this. Digging into my build # My deploy script ends with the following. After resetting keys and watching it build half a dozen times I determined that everything was working as normal here. Opening the Nelify Console # After poking at the netlify console for hours I realized that the issue was that netlify was still auto-deploying from a no longer existing directory and would cause 404’s for every page. During build, then my build from GitHub Actions would deploy with the netlify cli. Netlify really likes to put a lot of warnings up when you are not deploying from…
This is episode 1 of the Waylon Walker Audio experience, posts from waylonwalker.com {.hoverlink} in audio form. So I have had this idea for awhile to add audio to my blog posts. The idea partly comes from the aws blog, if you have ever been on their blog you will have noticed that they have a voiced by amazon polly section. What to Expect # Honestly I don’t know this is all new to me and I dont have much to go off of. For now its a test that may or may not work out. I will say that the time that I have available for clean audio is a bit limited so expect these to come out in batches as I get time to go back and record. What Not to Expect # One thing that makes the aws blog really hard to listen to is the robotic voice, I definitely don’t want that. This will be voiced by a real human, Me. At the same time written text doesn’t translate directly to audio well so don’t necessarily expect the audio to be word for word. Code blocks # There are a lot of code blocks in my blog, which don’t…
Inspired by discourse’s link expansion I am rolling out expansions for one line links on the blog waylonwalker. I was able to find a gatsby plugin gatsby-remark-embedder that expands one line links for social cards for popular platforms like twitter and YouTube through a repose from Kyle Mathews to my tweet. https://twitter.com/kylemathews/status/1329817928666005504 Use Cases # This covers a couple of use cases I have with very little effort. Twitter YouTube install # This was super quick and simple to setup, the only thing that was extra was to install the plugin as well as the. enable # Thats it, now I can embed tweets and YouTube videos by just leaving the link on a single line.
I wanted a super simple way to cross-link blog posts that require as little effort as possible, yet still looks good in vanilla markdown in GitHub. I have been using a snippet that puts HTML into the markdown. While this works, it’s more manual/difficult for me does not look the best, and does not read well as Goals for new card # The new card should be fully automated to expand with title, description, and cover image. Bonus if I am able to attach a comment behind it. fully automated card expansion Title description cover image Old Card # If you can call it a card 🤣. This card was just an image wrapped in an anchor tag and a paragraph tag. I found this was the most consistent way to get an image narrower and centered in both GitHub and dev.to. The key here is that I have to put the HTML into the markdown. It looks a bit dirty while editing and quite frankly it’s a pain to deal with. New Card # My first eight years as a working professional. First step # My first attempt was to make my…
When first learning to code its very common to hard code everything right into the code. This happens with most folks in just about any language. Whether its HTML or markdown for front end content, or even hardcoding parameters in our backend languages like python, or node.js. 🤷♀️ What’s wrong with hard coding everything? # Hard coding everything right into your code makes it really hard for non-technical collaborators to join. It makes it nearly impossible to hand websites off to clients without needing to come back for routine updates. The cms generally come with a rich content editor that feels more like something most folks are used to. There are buttons for changing the font, font-size, adding images, bold, italics, etc. Sometimes I don’t feel technical # Even when you are developing for a technical audience there is a layer of polish that comes from giving them a nice interface to edit their content in. YouTube doesn’t have you manually inserting records into the database to add…
I ran a discussion on dev that collected quite a list of examples in the comment section. So many great calls to action, animations, memes, and weird tricks. My current profile # social icons # Upload all of your icons to the repo in a directory such as or, then link them with a attribute like below. I used html for mine, not sure if you can set the in markdown. note I did add a bit of (non-breaking-whitespace) between my icons. Without adding css this seemed like the simplest way to do it. Center # Aligning things in the center of the readme is super simple. I used this trick to align my social icons in the middle. right # For my latest post I floated it to the right with a little bit of action. You may need to play with where you put this in the document, and the size of elements to get things to flow right. redirects # In order to keep my latest post always up to date on my readme I implemented a netlify redirect to always point to my latest post. As a digital gardener this helps me…
I just did a quick refactoring of my JAMStack blog urls. Some didn’t fit with my style, some had that I wanted to switch to, and others were ridiculously long. I’ve been using forestry as my CMS, I write many of my posts there, and sometimes it picks some crazy file names (based on my titles). It was time to refactor. Large Refactor At The Command Line When refactorings similar to this get really big I often need to do some project wide find an replace, I usually do this right from the command line. 🖊 Rename posts change the filename # My post urls are based on the file name of my markdown file, so I can simply go through my filesystem and rename anything I want. From here its probably best to only commit the addition of the new file name, until the redirects clear, but these are all low traffic posts for me so I just commited both at once. Safely redirect without breaking links _redirects ⤴ /redirects # I am hosted on netlify, which automatically puts very ⚡ performant redirects on th…
I want to incorporate some of the wonderful comments, \U0001F495, \U0001F984, and \U0001F516’s that I have been getting on dev.to on my website. I have dabbled once or twice with no avail this time I am taking notes on my journey, so follow along and let’s get there together. By the end of this post, I will have a way to get comments from posts on the client-side thanks to the wonderfully open dev.to API. I want to incorporate some of the wonderful comments, 💕, 🦄, and 🔖’s that I have been getting on dev.to on my website. I have dabbled once or twice with no avail this time I am taking notes on my journey, so follow along and let’s get there together. By the end of this post, I will have a way to get comments from posts on the client-side thanks to the wonderfully open dev.to API. The API # dev.to has an open API that allows us to easily get comments as HTML. They have their API hosted at https://docs.forem.com/api/#tag/comments, let’s take a look at it. Here we can see that going to ht…
Often when reading through javascript examples you will find some arrow functions use parentheses while others use braces. This key difference is that parentheses will implicitly return the last statement while braces require an explicit return statement. It is important to understand the difference between them because it is likely that you will find code examples of both and trying to edit code written differently than you’re used to may have unintended consequences. # Arrow functions are one-liner functions in javascript that have two main syntactical ways to create the code block. with parentheses and braces. Let’s take a look at both ways of creating arrow functions so that when we come accross them in the wild it will all make sense. # Here is an example of an arrow function that will implicitly return the last statement without the return keyword. I believe that these are a bit more restricted in that you cannot set variables inside them. They are a little bit more concise and g…
I am working through Wes Bos’s beginnerjavascript.com/ I just hit module 18 on hoisting. It’s something that I always knew was there, Its not something I typically see used or use myself. Do you Hoist? # Do you have any use cases that you use hoising? Why? It seems like a really cool feature in any language that uses it, but I dont really notice it in use. What is Hoising # There are many articles that cover this in far more depth, but its the idea that variable declarations and functions are defined before they are executed. This means that it doesnt matter if you call a function before or after it is defined. Hoisting # Running this code will log out “Waylon” What about variable hoisting # I am most familiar with python which does not variable hoist so this one kinda confused me at first. It only hoists the variable declaration not the value of the variable. It defines whether the variable is going to be,, or and sets it to undefined. It only hoists the variable declaration not the v…
Getting a custom scrollbar on your site makes it stand out a bit compared to the very plain stock one that are on most sites. This is how I set mine up on my gatsby site. Inspired by Wes Bos’s new uses.tech I wanted a custom scrollbar on my personal site. I had tried to do it in the past, but gave up after it was not working. Looking at the Source # Since uses.tech is open source I jumped on github, searched for scroll and found this layout.js. Copy it to my own component # My first step was to take his css and copy it into a styled component for my entire layout, but it failed. I do not fully understand why. None of the custom style came through at all. If you know please leave me a comment. I suspect for some reason it has to do with attatching to the html element inside of a styled-component. I think wes was able to get around this by using. But I was still using much of the default gatsby template, so I did not have a element, but I did have a layout.css. scroll.css # I added to my…