Before you deploy to cloudflare pages you need to create a project. You might
already have one, or you might want to create one in the webui, but you have
the option to create it at the command line with wrangler.
Now you can deploy your static application using wrangler to cloudflare pages.
In this example I have my application built into the markout directory, and
since the production branch is named markout I need to pass that in here as
well.
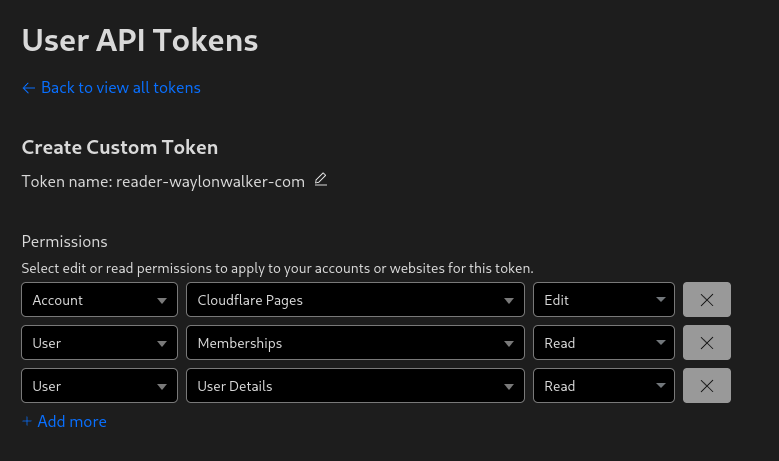
For my reader app I am using cronjobs to schedule my a new build and upload to
cloudflare pages every hour. In this example I have built a docker image
docker.io/waylonwalker/reader-waylonwalker-com and pushed it to dockerhub.
It uses a CLOUDFLARE_API_TOKEN secret to access cloudflare, and the
entrypoint itself does the build and upload.
I am working on a page for
htmx-patterns and I ran into a
situation with lots of duplication. Especially when i am using tailwind I run
into situations where the duplication can get tedious to maintiain. The
solution I found is macros.
Now I can use the same code for all of my links, and call the macro to use it.
jinja has a loop variable that is very handy to use with htmx. Whether you
want to implement a click to load more or an infinite scroll this loop variable
is very handy.
{% for person in persons %}
<li{%ifloop.last%}hx-get="{{ url_for('infinite', page=next_page) }}"hx-trigger="intersect once"hx-target="#persons"hx-swap='beforeend'hx-indicator="#persons-loading"{%endif%}{{person.name.upper()}}-{{person.phone_number}}</li>{% endfor %}
Now for every chunk of contacts that we load we will trigger the infinite
scroll by loading more once the last one has intersected the screen.
Out of the box FastAPI.">Starlette does not support url_for with query params. When
trying to use url_for with query params it throws the following error.
In my searching for this I found starlette issue #560 quite helpful, but not complete, as it did not work for me.
importjinja2ifhasattr(jinja2,"pass_context"):pass_context=jinja2.pass_contextelse:pass_context=jinja2.contextfunction@pass_contextdefurl_for_query(context:dict,name:str,**params:dict)->str:request=context["request"]url=str(request.url_for(name))ifparams=={}:returnurlfromurllib.parseimportparse_qs,urlencode,urlparse,urlunparse# Parse the URLparsed_url=urlparse(url)# Parse the query parametersquery_params=parse_qs(parsed_url.query)# Update the query parameters with the new onesquery_params.update(params)# Rebuild the query stringupdated_query_string=urlencode(query_params,doseq=True)# Rebuild the URL with the updated query stringupdated_url=urlunparse((parsed_url.scheme,parsed_url.netloc,parsed_url.path,parsed_url.params,updated_query_string,parsed_url.fragment,))ifos.environ.get("ENV")in["dev","qa","prod"]:updated_url=updated_url.replace("http","https",1)returnupdated_urldefget_templates():templates=Jinja2Templates(directory="templates")templates.env.globals["url_for"]=url_for_queryreturntemplates
https
If you want url_for to work in production you need some way to convert http
to https. Here is how I make it work, for local development I export ENV=local then for each environment that I am running on a server I include
it in the list and update ENV appropriately.
To access the home route using url_for in a jinja template you can use the
following, once you have applied the url_for_query function as your default
url_for
<ahref="{{ url_for('home', page=1) }}">Home</a>
Kind (Kubernetes in Docker) is a tool that makes it easy to create and tear
down local clusters quickly. I like to use it to test out new workflows.
Argocd is a continuous delivery tool that makes it easy to setup gitops
workflows in kubernetes.
Here is how you can setup a new kind cluster and install argocd into it using
helm, the kubernetes package manager.
kind create cluster --name argocd
# your first time through you need to add the argocd repohelm repo add argo https://argoproj.github.io/argo-helm
helm repo update
# install argocd into the clusterhelm install argo argo/argo-cd --namespace argocd --create-namespace
# deploy the app of appskubectl apply -f apps/apps.yaml
If you want to add repos and apps to your cluster you can use the argo cli to
do that, but first you will need forward the argocd port and login.
# Wait until Argo CD API server is availableecho"Waiting for Argo CD API server to be available..."while ! kubectl wait --for=condition=available --timeout=60s deployment/argo-argocd-server -n argocd;doecho"Waiting for Argo CD API server to be ready..." sleep 10donekubectl port-forward svc/argo-argocd-server -n argocd 8080:443 &argocd_admin_password=$(kubectl get secret argocd-initial-admin-secret -n argocd -o jsonpath="{.data.password}"| base64 -d)argocd login localhost:8080 --insecure --username admin --password $argocd_admin_passwordargocd repo add https://github.com/fokais-com/app.fokais.git --username waylonwalker --password ${GH_ARGO_PAT}argocd app create app-fokais-local --repo https://github.com/fokais-com/app.fokais.git --path k8s/overlays/local --dest-server https://kubernetes.default.svc --sync-policy automated --sync-option Prune=true
In my homelab kubernetes cluster I am using kubeseal to encrypt secrets. I
have been using it successfully for a few months now wtih great success. It
allows me to commit all of my secrets manifests to git with out risk of leaking
secrets.
You see kubeseal encrypts your secrets with a private key only stored in your
cluster, so only the cluster itself can decrypt them using the kubeseal
controller.
Most of these commands come straight from the docs. From my experience I have
always specified the namespace, my projects go per namespace and I don’t have
any reason that other namepsaces should see the secret, and if they do I deploy
another secret in that namespace.
# Create a json/yaml-encoded Secret somehow:# (note use of `--dry-run` - this is just a local file!)echo -n bar | kubectl create secret generic mysecret --dry-run=client --from-file=foo=/dev/stdin -o yaml -n thenamespace > mysecret.yaml
note that the key of the secret is foo and the value is bar
# This is the important bit:kubeseal -f mysecret.yaml -w mysealedsecret.yaml
# At this point mysealedsecret.json is safe to upload to Github,# post on Twitter, etc.# Eventually:kubectl create -f mysealedsecret.yaml -n thenamespace
# sealedsecret.bitnami.com/mysecret created# Profit!kubectl get secret mysecret
kubectl get secret mysecret -n thenamespace
# NAME TYPE DATA AGE# mysecret Opaque 1 27scat mysealedsecret.yaml | kubeseal --validate
Now the main downside I see with kubeseal is that it does not provide a way to
store your secrets in a way that you can access outside of your cluster. So
you need to make sure that you have another solution in place to store your
secrets so that you still have them if you ever were to take the cluster down
or move from k8s to something else.
Overall the likelyhood of you loosing a production cluster is pretty low, so
maybe it’s ok to just trust it depending on what the secrets are. Especially
for things you control and can rotate anyways its fine.
So after months of fighting with gf not going to template files, I finally
decided to put in some effort to make it work.
This was the dumbest keybind in my config, that I copied from someone else
without understanding it.
after digging into my keymap I found that I had remaped gf to edit years
ago. This works great if the file is in your current directory, and if it’s not
it makes the file. This bind completely breaks vim’s ability to :find files
and was a terrible keybind that I added probably from someone else years ago
and have literally never used this feature. If gf opens an empty file I
always close it and assume that vim failed to :find the file.
-- Allow gf to open non-existent filesset("","gf",":edit <cfile><CR>")
Yes, after that fix I still needed to adjust my path #
I ended up with the following in my options.lua.
-- look for jinja templates in the templates directoryvim.opt.path:append("templates/**")
Authentication from cli tools can be a bit of a bear, and I have to look it up
every time. This is my reference guide for future me to remember how to easily
do it.
I set up a fastapi server running on port 8000, it uses a basic auth with
waylonwalker as the username and asdf as the password. The server follows
along with what comes out of the docs. I have it setup to take basic auth,
form username and password, or a bearer token for authentication.
# installpython3 -m pip install httpie
# basic authhttp POST localhost:8000/token -a waylonwalker:asdf
# basic auth with password prompthttp POST localhost:8000/token -a waylonwalker
# tokenhttp POST localhost:8000/token -A bearer -a eyJhbGciOiJIUzI1NiIsInR5cCI6IkpXVCJ9.eyJzdWIiOiJ3YXlsb253YWxrZXIiLCJleHAiOjE3MDI5NTI2MDJ9.GeYNt7DNal6LTiPoavJnqypaMt4vYeriXdq5lqu1ILg
http-prompt comes from the httpie org, and has an interactive cli interface
into apis. You can even specify a spec file to autocomplete on api methods.
I am working on fokais.com’s signup page, and I want to hide the form input during
an htmx request. I was seeing some issues where I was able to prevent spamming
the submit button, but was still able to get one extra hit on it.
It also felt like nothing was happening while sending the email to the user for
verification. Now I get the form to disappear and a spinner to show during the
request.
Let’s start off with the form. It uses htmx to submit a post request to the
post_request route. Note that there is a spinner in the post_request with the
htmx-indicator class.
The intent is to hide the spinner until the request is running, and hide all of
the form input during the request.
Here is the final result of me signing up for a new account in fokais.
Today I am working on fokais.com, trying to get to a point where I can launch
by workig through stripe integrations. This is my first time using stripe, so
there has been quite a bit to learn, and I am probably building in more than I
need to before launching, but I am learning, and not in a rush to launch.
I am building the fokais backent in python primarilyt with fastapi and sqlmodel
on sqlite. My billing integration is going to be all Stripe.
Here is a link to the stripe docs for your refrence, especially if you want to
see how to cancel subscriptions in other languages. They include code samples
for many popular languages.
Here is the cancellations api. I created an are you sure form that I can link
to from the accounts page with a normal anchor tag. Note that I am doing a
POST request to do the cancellation from a form. I want this to work for any
user whether there is js or not. This is an operation that will change the
users data, and I want to make sure that it avoids all browser and cdn caching.
As a scrappy startup we are running light on infrastructure and are caching
hard at the CDN to avoid excessive server hits.
Note
I am doing a `POST` request to do the cancellation from a form.
@pricing_router.get("/cancel")@pricing_router.get("/cancel/")defget_cancel(request:Request,current_user:Annotated[User,Depends(get_current_user_if_logged_in)],):returnconfig.templates.TemplateResponse("cancel.html",{"request":request,"prices":products.prices,"products":products.products,"current_user":current_user,},)@pricing_router.post("/cancel")@pricing_router.post("/cancel/")defpost_cancel(request:Request,current_user:Annotated[User,Depends(get_current_user_if_logged_in)],):current_user.cancel_subscription()returnHTMLResponse('<p id="cancel" hx-swap-oob="outerHTML">Your Subscription has been Cancelled</p>')
Reactivating accounts looks just about the same as cancelling, only flippng True to False.
@pricing_router.get("/reactivate")@pricing_router.get("/reactivate/")defget_reactivate(request:Request,current_user:Annotated[User,Depends(get_current_user_if_logged_in)],):returnconfig.templates.TemplateResponse("reactivate.html",{"request":request,"prices":products.prices,"products":products.products,"current_user":current_user,},)@pricing_router.post("/reactivate")@pricing_router.post("/reactivate/")defpost_reactivate(request:Request,current_user:Annotated[User,Depends(get_current_user_if_logged_in)],):current_user.reactivate_subscription()returnHTMLResponse('<p id="reactivate" hx-swap-oob="outerHTML">Your Subscription has been reactivated</p>')
I’ve been using tailwind for a few months now and I can still say I’m loving
it. I’ve been using it to create some rapid prototypes that may or may not
ever become something, a document that is likely to go to print (a resume), and some quick
dashboards.
I started working on fokais.com only a few weeks ago, It’s going to be a SAS to
make blogging easier. I’ve started hosting some tools for this blog that I
really like that I think I can turn into a service. It’s been fantastic to
quickly pump out new pages with tailwind.
tailwind and htmx are a match made in heaven. They both really lean on
Location of Behavior over Separation of concerns. They do really well at
making small components that you can throw on and endpoint and stack into any
page. With tailwind I just configure it to look at all my templates, and I can
guarantee that the styles will be in app.css, and all I need to do is add
classes to my component.
Heres a sample component for a user widget that will go on every page. It has
everything it needs right in the template.
I’ve built several interal apps, and tailwind has been really great for this.
Its super quick to pop classes on components and get things to look decent
quickly, or put some real polish into making them look nice.
I’ve dropped my old decrepid css for some tailwind on my main site. My css was
much smaller, but did not work quite as well on all devices, and most
importantly was becoming a house of cards. Every time I fixed one thing several
other things would fail. Colors were a bit muddy, and not as nicely configured
as tailwind.
Most importantly was becoming a house of cards. Every time I fixed one thing
several other things would fail.
One rough side of styling a blog in tailwind is that you don’t necessarily have
control over granular details of how your pages get rendered without getting
really deep into the markdown renderer, or writing your posts in html. It ends
up looking a bit ugly, and is against the tailwind best practices, but it seems
like the best way for a site like this.
I’ve struggled to use grid on my projects, and I’ve tried a few different times
with no real success or adoption, but started using it on my resume, to have a
main middle column, with two outer full bleed columns where I can make some
elements full bleed to the edge. tailwind made this easy, once done, I had an
admonition that was beautiful full bleed with a touch of color.
jpillora/installer is the install script generator I have been looking for. It
downloads binaries for your machine from GitHub releases and unzips them for
you. It grabs the latest release, so you can easily update them. I have
tried scripting these installs in the past and struggled to consistently get
the latest version for every package and unpack it correctly.
Also these pre-compiled binaries install rediculously fast compared to building
them from source.
I wanted to host some static files through fastapi. Typical use cases for this
might be some static web content like html/css/js. It could also be images or
some data that doesn’t need dynamically rendered.
OscartGiles posted this solution to add
authentication to static files. I tried this out on my
thoughts and it worked flawlessly.
importtypingfrompathlibimportPathimportsecretsfromfastapiimportFastAPI,Request,HTTPException,statusfromfastapi.staticfilesimportStaticFilesfromfastapi.securityimportHTTPBasic,HTTPBasicCredentialsPathLike=typing.Union[str,"os.PathLike[str]"]app=FastAPI()security=HTTPBasic()asyncdefverify_username(request:Request)->HTTPBasicCredentials:credentials=awaitsecurity(request)correct_username=secrets.compare_digest(credentials.username,"user")correct_password=secrets.compare_digest(credentials.password,"password")ifnot(correct_usernameandcorrect_password):raiseHTTPException(status_code=status.HTTP_401_UNAUTHORIZED,detail="Incorrect email or password",headers={"WWW-Authenticate":"Basic"},)returncredentials.usernameclassAuthStaticFiles(StaticFiles):def__init__(self,*args,**kwargs)->None:super().__init__(*args,**kwargs)asyncdef__call__(self,scope,receive,send)->None:assertscope["type"]=="http"request=Request(scope,receive)awaitverify_username(request)awaitsuper().__call__(scope,receive,send)app.mount("/static",AuthStaticFiles(directory=Path(__file__).parent/"static"),name="static",)
If you want both then, all you have to do is mount AuthStaticFiles to a
different route. Now you can have private, or paid content behind
/restricted.
I recently se tup minio object storage in my homelab for litestream sqlite
backups. The litestream quickstart made it easy to get everything up and
running on localhost, but I hit a wall when dns was involved to pull it from a
different machine.
The next version of markata will be around a full second faster at building
it’s docs, that’s a 30% bump in performance at the current state. This
performance will come when virtual environments are stored in the same
directory as the source code.
I was looking through my profiler for some unexpected performance hits, and
noticed that the docs plugin was taking nearly a full second (sometimes
more), just to run glob.
Now glob.py from the docs plugin does not even show up in the profiler.
I opened up ipython and saw the following results. For some reason as I hit
docs.glob it was only hitting 488 ms from ipython, but it was still a massive
improvement over the original.
%timeitdocs.glob(m)# 488 ms ± 3.05 ms per loop (mean ± std. dev. of 7 runs, 1 loop each)%timeitdocs.glob(m)# 9.37 ms ± 90.9 µs per loop (mean ± std. dev. of 7 runs, 100 loops each)
AUR.">paru is an aur helper that allows you to use a package manager to install
packages from the aur.
Once setup you are ready to install packages from the AUR just like the core repos.
# you can update your system using paru
paru -Syu

# you can install packages from the AUR
paru -S tailscale
paru -S prismlauncher

# even core repo packages can be installed
paru -S docker
There are other options out there, paru seemed to be the most supported at the
time I started using arch and there has been no other reason for me to change
it. It’s treated me well for nearly a year now.
Quickly and easily create new versions of your Python package with the gh release
command. Get the version number, changelog, and
Releasing a new version of your Python package can be a daunting task. You need to make
sure that all the necessary files are included, and that the version number is correct.
But now, with the help of the gh release command, you can make the process much
smoother.
The gh release command allows you to quickly and easily create a new version of your
Python package. All you need to do is provide the version number, the changelog, and the
distribution files. For example, if you wanted to create a new version of your package
with the version number v1.2.3, you could use the following command:
This command will create a new version of your package with the specified version number,
and include the changelog and the distribution files. It’s a great way to make sure that
all the necessary files are included in the release, and that the version number is
correct.
The gh release command is a great tool for quickly and easily creating new versions of
your Python package. With just a few simple commands, you can make sure that all the
necessary files are included, and that the version number is correct. So if you’re looking
for an easy way to release a new version of your Python package, give the gh release
command a try.
Fix Arch Linux randomly rejecting passwords with one command. Try
‘faillock –user $USER’ to reset login counter and regain access. Quick
solution for a smooth computing"
If you’re an Arch Linux user, you may have experienced a frustrating issue
where your password is randomly not being accepted by the system. This can be a
major inconvenience and can cause a lot of frustration, especially if it
happens frequently.
The good news is that there is a simple fix for this issue. The following bash
code can be used to fix the problem:
bash faillock --user $USER
This command is used to reset the failed login count for the current user. By
running this command, you will be able to reset the system’s login counter and
regain access to your account.
It’s important to note that this command should only be used as a temporary
solution. If you find yourself frequently having to run this command, it’s
likely that there is a deeper issue with your system that needs to be
addressed.
In any case, if you’re experiencing problems with your Arch Linux system not
accepting your password, give the above command a try and see if it resolves
the issue for you.