Posts tagged: cli

All posts with the tag "cli"

100 posts latest post 2026-06-29
Publishing rhythm
Jun 2026 | 2 posts

tmux popups can be sized how you like based on the % width of the terminal on creation by using the flags (h, w, x, y) for height, width, and position.

# normal popup
tmux popup figlet "Hello"
# fullscreen popup
tmux popup -h 100% -w 100% figlet "Hello"
# 75% centered popup
tmux popup -h 100% -w 75% figlet "Hello"
# 75% popup on left side
tmux popup -h 100% -w 75% -x 0% figlet "Hello"

example running these commands

I was completely stuck for awhile. copier was not replacing my template variables. I found out that adding all these _endops fixed it. Now It will support all of these types of variable wrappers

# copier.yml
_templates_suffix: .jinja
_envops:
  block_end_string: "%}"
  block_start_string: "{%"
  comment_end_string: "#}"
  comment_start_string: "{#"
  keep_trailing_newline: true
  variable_end_string: "}}"
  variable_start_string: "{{"

!RTFM: Later I read the docs and realized that copier defaults to using [[ and ]] for its templates unlike other tools like cookiecutter.

I’ve been looking for a templating tool for awhile that works well with single files. My go to templating tool cookiecutter does not work for single files, it needs to put files into a directory underneath of it.

template variables #

By default copier uses double square brackets for its variables. variables in files, directory_names, or file_names will be substituted for their value once you render them.

# hello-py/hello.py.tmpl
print('hello-[[name]]')

note! by default copier will not inject variables into your template-strings unless you use a .tmpl suffix.

Before running copier we need to tell copier what variables to ask for, we do this with a copier.yml file.

# copier.yml
name:
  default: my_name
  type: str
  help: What is your name

installing copier #

I prefer to install cli tools that I need globally with pipx, this always gives me access to the tool without worrying about dependency conflicts, bloating my system site-packages, or managing a separate virtual environment for it myself.

pipx install copier

running copier #

When running copier copy we pass in the directory of the template, and the directory that we want to render the template into.

copier copy hello-py .

note! the directory ‘.’ is often referred to in cli programs to represent the current working directory that we are calling the command from.

results #

The resulting files will have your variables injected into them if you have setup your template and copier.yml up correctly.

print('hello-you')

One of the most useful skills you can acquire to make you faster at almost any job that uses a computer is getting good at finding text in your current working diretory and identifying the files that its in. I often use the silver searcher ag or ripgrep rg to find files in large directories quickly. Both have a sane set of defaults that ignore hidden and gitignored files, but getting them to list only the filenames and not the matched was not trivial to me.

I’ve searched throught he help/man pages many times looking for these flags and they always seem to evade me.

ag #

Passing the flag -l to ag will get it to list only the filepath, and not the match. Here I gave it a --md as well to only return markdown filetypes. ag supports a number of filetypes in a very similar way.

ag nvim --md -l

rg #

Giving rg the --files-with-matches flag will yield you a similar set of results, giving only the filepaths themselves and not the match statement. Also passing in the -g "*.md" will similarly yield only results from markdown files.

rg --files-with-matches you -g "*.md"

pyenv provides an easy way to install almost any version of python from a large list of distributions. I have simply been using the version of python from the os package manager for awhile, but recently I bumped my home system to Ubuntu 21.10 impish, and it is only 3.9+ while the libraries I needed were only compatable with up to 3.8.

I needed to install an older version of python on ubuntu

I’ve been wanting to check out pyenv for awhile now, but without a burning need to do so.

installing #

Based on the Readme it looked like I needed to install using homebrew,so this is what I did, but I later realized that there is a pyenv-installer repo that may have saved me this need.

Installing Homebrew on Linux

List out install candidates #

You can list all of the available versions to install with pyenv install --list. It does reccomend updating pyenv if you suspect that it is missing one. At the time of writing this comes out to 532 different versions!

pyenv install --list

Let’s install the latest 3.8 patch #

Installing a version is as easy as pyenv install 3.8.12. This will install it, but not make it active anywhere.

pyenv install 3.8.12

let’s use python 3.8.12 while in this directory #

Running pyenv local will set the version of python that we wish to use while in this directory and any directory underneath of it while using the pyenv command.

pyenv local python3.8.12

.python-version file #

This creates a .python-version files in the directory I ran it in, that contains simply the version number.

3.8.12

using with pipx #

I immediately ran into the same issue I was having before when trying to run pipx, as pipx was running my system python. I had to install pipx in the python3.8 environment to get it to use it.

pyenv exec pip install pipx
pyenv exec pipx run kedro new

python is still the system python #

When I open a terminal and call python its still my system python that I installed and set with update-alternatives. I am not sure if this is expected or based on how I had installed the system python previously, but it’s what happened on my system.

update-alternatives --query python

Name: python
Link: /home/walkers/.local/bin/python
Status: auto
Best: /usr/bin/python3
Value: /usr/bin/python3

making a virtual environment #

To make a virtual environment, I simply ran pyenv exec python in place of where I would normally run python and it worked for me. There is a whole package to get pyenv and venv to play nicely together, so I suspect that there is more to it, but this worked well for me and I was happy.

pyenv exec python -m venv .venv --prompt $(basename $PWD)

Now when my virtual environment is active it points to the python in that virtual environment, and is the version of python that was used to create the environment.

https://github.com/pyenv/pyenv#installation
Installing brew on linux proved quite easy and got pyenv running for me within 4 commands.

I had never used homebrew before, honestly I thought it was a mac only thing for years. Today I wanted to try out pyenv, and the reccommended way to install was using homebrew. I am not yet sure if I want either in my normal workflow, so for now I am just going to pop open a new terminal and install homebrew and see how it goes.

/bin/bash -c "$(curl -fsSL https://raw.githubusercontent.com/Homebrew/install/HEAD/install.sh)"
echo 'eval "$(/home/linuxbrew/.linuxbrew/bin/brew shellenv)"' >> /home/walkers/.zprofile
eval "$(/home/linuxbrew/.linuxbrew/bin/brew shellenv)"

That was it, now homebrew is working. Starting a new shell and running the command to install pyenv worked.

brew install pyenv

When I first moved to vim from and ide like vscode or sublime text one of my very first issues was trying to preview my website at localhost:8000. There had always just been a button there to do it in all of my other editors, not vim. There are not many buttons for anything in vim. While there is probably a plugin that can run a webserver for me in vim, it’s not necessary, we just need the command line we are already in.

running a separate process #

You will need a way to run another process alongside vim, here are a couple ideas to get you going that are not the focus here.style

  • use background jobs
    • c-z to send a job to the background
    • fg to bring it back
  • use a second terminal
  • use a second tab
  • use tmux and run it in a separate split/window
  • use an embeded nvim terminal

running a development webserver from the command line #

Python already exists on most linux systems by default, and most are now on python3. If you are on windows typing python will take you directly to the windows store to install it, or you can also use wsl.

# python3
python -m http.server

# running on port 5000
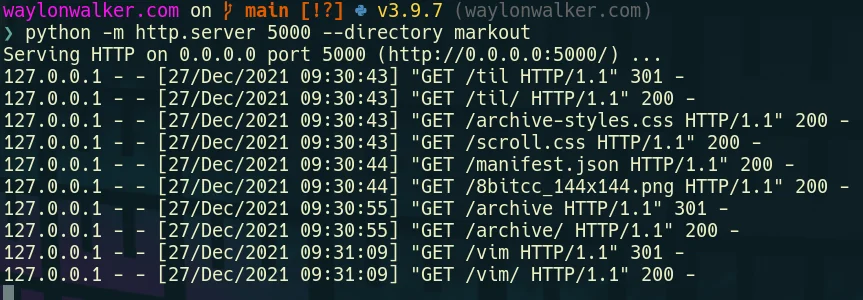
python -m http.server --directory markout 5000
# for the low chance you are on python2
python -m SimpleHTTPServer

# running on port 5000
python -m SimpleHTTPServer 5000
python -m SimpleHTTPServer --directory markout 5000

running a python static webserver from the command line

using nodejs #

If you are a web developer it’s likely that you need nodejs and npm on your system anyways and may want to use one of the servers from npm. I’ll admit with these not being tied to the long term support of a language they are much more feature rich with things like compression out of the box. In my opinion they are nice things that you would want out of a production server, but may not be necessary for development.

installing npx #

# if you don't alredy have npx
npm i -g npx

npx is a handy tool that lets you run command line applications straight from npm without installing them. It pulls the latest version every time you want to run, then executes it without it being installed.

running the http-server with npx #

npx http-server

# running on port 5000
npx http-server -p 5000
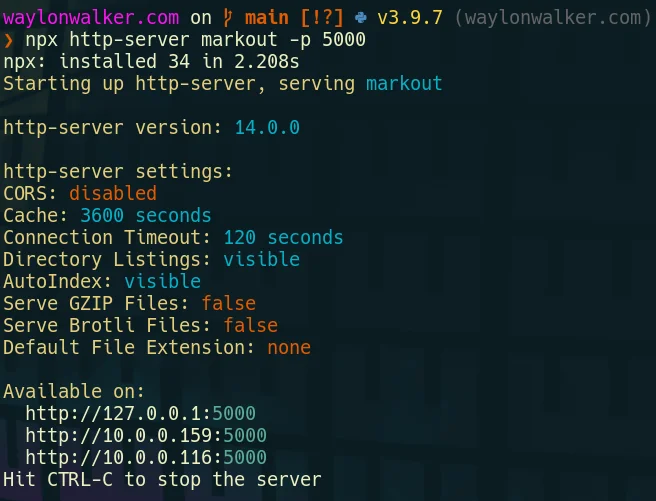
npx http-server markout -p 5000

running a nodejs static webserver from the command line

Code Review from the comfort of vim | Diffurcate

I often review Pull requests from the browser as it just makes it so easy to see the diffs and navigate through them, but there comes a time when the diffs get really big and hard to follow. That’s when its time to bring in the comforts of vim. https://youtu.be/5NKaZFavM0E Plugins needed # [1] This all stems from the great plugin by AndrewRadev [2]. It breaks a down into a project. So rather than poping into a pager from git [3] diff, you can pipe to diffurcate and it will setup a project in a tmp directory for you and you can browse this project just like any other except it’s just a diff. Plug 'AndrewRadev/diffurcate.vim' My aliases # [4] First to quickly checkout PR’s from azure devops I have setup an alias to fuzzy select a pr and let the az command do the checkout. alias azcheckout='az repos pr checkout --id $(az repos pr list --output table | tail -n -2 | fzf | cut -d " " -f1)' Next I have a few aliases setup for checking diffs. The first one checks what is staged vs the...

Open files FAST from zsh | or bash if thats your thing

https://youtu.be/PQw_is7rQSw I am often in a set of tmux splits flying back and forth, accidentally close my editor, so when I come back to that split and hit my keybinds to edit files I enter them into zsh rather than into nvim like I intended. Today I am going to sand off that rough edge and get as similar behavior to nvim as I can with a couple of aliases. Make sure you check out the YouTube video to see all of my improvements. what’s an alias # [1] If you have never heard of an alias before it’s essentially a shortcut to a given command. You can pass additional flags to the underlying command and they will get passed in. Most of the time they are just shorter versions of commands that you run often or even like in this case a common muscle memory typo that occurs for you. My new alias’s for fuzzy editing files from zsh # [2] Here are the new aliases that I came up with to smooth out my workflow. These give me a similar feel to how these keys work in neovim but from zsh. #...

30 days dotfile ricing

https://youtu.be/Jq1Y48F_rOU I am challenging myself to 30 days of dotfile ricing. I have been on linux desktop for a few months now and have a pretty good workflow going, I have the coarse edits done to my workflow, but it has some rough edges that need sanded down. It’s time to squash some of those little annoyances that still exist in my setup. This is primarily going to be focused on productivity, but may have a few things to just look better. This will comprise heavily of aliases, zsh, and nvim config. Follow the YouTube channel [1] or the rss feed [2] to stay up to date. References: [1]: https://youtube.com/waylonwalker [2]: https://waylonwalker/rss/

Uses

This is a listing of all the things that I use on a daily basis to build data pipelines, lead my team, and build this website. older editions # [1] [[ uses-2021 ]] Installation # [2] Everything installed on my machines is done through ansible-playbooks. It’s been a long transformation to get here, but its so satisfying to boot a brand new system, run a single command a have every single thing cofigured exactly to my liking. # GET is available by default on Ubuntu GET waylonwalker.com/bootstrap | bash # For debian based systems without GET by default sudo apt install curl curl -F https://waylonwalker.com/bootstrap | bash OS # [3] I run Ubuntu, it works well for me without too much fuss. For me the distribution does not really matter too much, I’m more interested in what’s inside. Window Manager # [4] I use awesome wm. Awesome is a tiling window manager that alows me to navigate through 9 workspaces (technically called tags in awesomewm). I can script out certain applications...

Update Alternatives in Linux

update-alternatives --query python update-alternatives: error: no alternatives for python sudo update-alternatives --install /usr/local/bin/python python `which python3.8` 2 # update-alternatives: using /usr/bin/python3.8 to provide /usr/local/bin/python (python) in auto mode sudo update-alternatives --install /usr/local/bin/python python `which python2.7` 5 # update-alternatives: using /usr/bin/python2.7 to provide /usr/local/bin/python (python) in auto mode update-alternatives --query python # Name: python # Link: /usr/local/bin/python # Status: auto # Best: /usr/bin/python2.7 # Value: /usr/bin/python2.7 # # Alternative: /usr/bin/python2.7 # Priority: 5 # # Alternative: /usr/bin/python3.8 # Priority: 2 sudo update-alternatives --install /usr/local/bin/python python `which python3.8` 20 # update-alternatives: using /usr/bin/python3.8 to provide /usr/local/bin/python (python) in auto mode

JUT | Read Notebooks in the Terminal

Trying to read a .ipynb file without starting a jupyter server? jut has you covered. https://youtu.be/t8AvImnwor0 watch the video version of this post on YouTube [1] 57676ca9-23dd-4b3d-a084-293a0525eba5.mkv [2] Or watch the full thing here install # [3] jut is packaged and available on pypi so installing is as easy as pip installing it. pip install jut installing jut with pip [4] ! This is my first time including snippets of the video in the article like this, let me know what you think! examples # [5] jut https://cantera.org/examples/jupyter/thermo/flame_temperature.ipynb jut https://cantera.org/examples/jupyter/thermo/flame_temperature.ipynb --head 3 jut https://cantera.org/examples/jupyter/thermo/flame_temperature.ipynb --tail 2 running jut examples [6] what are all the commands available for jut? # [7] Take a look at the help of the jut cli to explore all the options that it offers. jut --help There is some good information on the projects readme [8] as well. getti...

tmux targeted session

https://youtu.be/5KE7Il7SOEk This is something that I made up but use every single day, this is what keeps much of what is on my blog or my teams private work wiki going. I have a few very important directories that I have assigned directly to a hotkey for fast session switching. bind -n M-i new-session -A -s waylonwalker_com "cd ~/git/waylonwalker.com/ && nvim" bind i popup -E -h 95% -w 95% -x 100% "tmux new-session -A -s waylonwalker_com 'cd ~/git/waylonwalker.com/ && nvim'" bind -n M-I popup -E "tmux new-session -A -s waylonwalker_com 'cd ~/git/waylonwalker.com/ && nvim'" tmux new-session [1] This one is building off of yeserday’s new-session post, make sure you check that one out as well. How I navigate tmux in 2021 [2] for more information on how I navigate tmux, check out this full post Also check out the full YouTube tmux-playlist [3] to see all of the videos in this series. References: [1]: /tmux-new-session/ [2]: /tmux-nav-2021/ [3]: https://www.youtube.com/playlist?...

tmux detach

https://youtu.be/A1qx3tNKDdA tmux detach is a handy tmux command that will quit your current session while keeping it running. The full name of the comamnd is detach-client, detach is a shorthand. default keybinding bind-key d detach-client I have mine bound to mod+d where mod is alt. bind -n M-d detach-client https://waylonwalker.com/tmux-nav-2021/ for more information on how I navigate tmux, check out this full post Also check out the full YouTube tmux-playlist [1] to see all of the videos in this series. References: [1]: https://www.youtube.com/playlist?list=PLTRNG6WIHETB4reAxbWza3CZeP9KL6Bkr

notify-send

xinput float $(xinput list --id-only "AT Translated Set 2 keyboard") | notify-send "laptop keeb floated" -i ~/Pictures/8bitcc.png

tmux attach

https://youtu.be/JQ0yDCVu44E attach is one of the most useful features of tmux. If you have no interest in tmux for pane and window management, you should use tmux for this. It can be a life saver if you ever get disconnected from the host machine or accidently close your terminal you can connect right back into the session you were just in using attach. attach # [1] tmux attach this command will simply attach back to tmux if you are ever disconnected If you ever run long running tasks on a remote machine by sshing into this you should be doing it inside tmux, or something like tmux so that you do not loose your work. attach to a specific session # [2] If you have multiple sessions running you can select the session that you want to attach to by passing -t <name-of-session>. tmux attach -t scratch How I navigate tmux in 2021 [3] for more information on how I navigate tmux, check out this full post Also check out the full YouTube tmux-playlist [4] to see all of the videos i...

tmux ls

https://youtu.be/LY41GLn_DGg tmux ls will list the sessions that you have running within the tmux server if tmux is currently running. This is handy to combine with commands such as attach. tmux ls tmux attach [1] How I navigate tmux in 2021 [2] for more information on how I navigate tmux, check out this full post Also check out the full YouTube tmux-playlist [3] to see all of the videos in this series. References: [1]: /tmux-attach/ [2]: /tmux-nav-2021/ [3]: https://www.youtube.com/playlist?list=PLTRNG6WIHETB4reAxbWza3CZeP9KL6Bkr

tmux command line

https://youtu.be/SNu-4IrkjAs So far we have covered a lot of tmux commands and how they map to keybindings but these same commands can be executed at the command line. From the command line # [1] Let’s make a popup that displays our git [2] status for 5s or until we close it manually. We can run the following command at the command line, in a split. tmux display-popup -E -d '#{pane_current_path}' 'git status && sleep 5' From the tmux command line # [3] Or we can open the tmux command line and run it from tmux’s built in command line, which is very similar to bim EX mode. By default the tmux command line can be opened with prefix+[. display-popup -E -d '#{pane_current_path}' 'git status && sleep 5' 🗒️ note that the tmux command is called by default when inside of tmux. Make it a keybinding # [4] Finally we can make it a keybinding by adding a bind command ahead of our tmux command, then we can execute this in the tmux command line or add it to our ~/.tmux.conf. bind s displ...