Posts tagged: python

All posts with the tag "python"

310 posts latest post 2026-05-06
Publishing rhythm
Jan 2026 | 3 posts

Whenever you are installing python packages, you should always use a virtual environment. pip makes this easy to follow by adding some configuration to pip.

require-virtualenv #

Pip is the pacakage tool for python. It installs third-party packages and is configurable. One of the configuration settings that I highly reccommend everyone to add is require-virtualenv. This will stop pip from installing any packages if you have not activated a virtualenv.

why #

python packages often require many different dependencies, sometimes packages are up to date and sometimes they require different versions of dependencies. If you install everything in one environment its easy to end up with version conflict issues that are really hard to resolve, especially since your system environment cannot easily be restarted.

PIPX my one exception #

My one exception that I put in my system level packages is pipx. pipx is very handy as it manages virtual environments for you and is intended for command line utilities that would end up in your system env or require you to manually manage virtual environments without it.

pip config #

Your pip config might be found in either ~/.pip/pip.conf or ~/.config/pip/pip.conf. You can either use the pip config set command or edit one of these files manually.

pip config set global.require-virtualenv True

Now you sould see this in your ~/.config/pip/pip.conf

[global]
require-virtualenv = True

pip config debug #

If you want to know where pip is looking for configuration on your system, and what files are setting a certain config you can use pip config debug to find it.

❯ pip config debug

env_var:
env:
global:
  /etc/xdg/xdg-awesome/pip/pip.conf, exists: False
  /etc/xdg/pip/pip.conf, exists: False
  /etc/pip.conf, exists: False
site:
  /home/waylon/git/waylonwalker.com/.venv/pip.conf, exists: False
user:
  /home/waylon/.pip/pip.conf, exists: False
  /home/waylon/.config/pip/pip.conf, exists: True
    global.require-virtualenv: True

saved my bacon #

This setting recently saved me when I modified my .envrc file my virtual environment deactivated, so when I went to pip install something it gave me an error that it was not active. Situations like this are an easy way to pollute your system with packages that it does not need installed.

pip-require-virtualenv-direnv-error.webp

TLDR #

Run this at your command line to avoid polluting your system environment by mistake before running any pip command.

pip config set global.require-virtualenv True

I’ve been trying to adopt pyenv for a few months, but have been completely blocked by this issue on one of the main machines I use. Whenever I start up ipython I get the following error.

ImportError: No module named '_sqlite3

I talked about why and how to use pyenv along with my first impressions in this post

pyenv/issues/678 #

According to #678 I need to install libsqlite3-dev on ubuntu to resolve this issue.

install libsqlite3-dev #

libsqlite3-dev can be installed using apt

sudo apt install libsqlite3-dev

But wait…. #

When I make a fresh env and install ipython I still get the same error and I am still not able to use ipython with pyenv.

ImportError: No module named '_sqlite3

re-install python #

After having this issue for awhile an coming back to #678 several times I realized that libsqlite3-dev needs to be installed while during install.

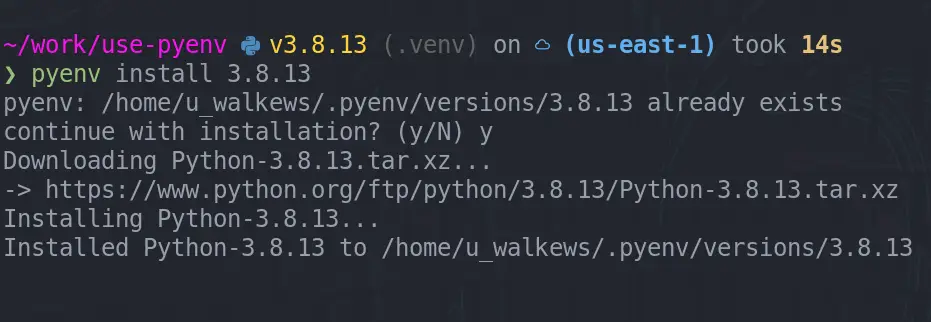
pyenv install 3.8.13

I think I had tried this several times, but was missing the -y option each time. You gotta read errors like this, I am really good at glossing over them.

pyenv-install-exists.webp

Let’s never have this issue again. #

When you spend months living with little errors like this and finally fix it, its good to make sure that it never happens again. Whenever I start a new ubuntu machine I run an ansible playbook that does all the setup for me. I added libsqlite3-dev to my core install in 64c85ca now it will be on all of my machines and not break again.

Using Different versions of python with pipx | pyenv

[1] I love using pipx for automatic virtual environment [2] management of my globally installed python cli applications, but sometimes the application is not compatible with your globally installed pipx Which version of python is pipx using?? # [3] This one took me a minute to figure out at first, please let me know if there is a better way. I am pretty certain that this is not the ideal way, but it works. My first technique was to make a package that printed out sys.version. # what version of python does the global pipx use? pipx run --spec git+https://github.com/waylonwalker/pyvers pyvers # what version of python does the local pipx use? python -m pipx run --spec git+https://github.com/waylonwalker/pyvers pyvers Let’s setup some other versions of python with pyenv # [4] If you don’t already have pyenv [5] installed, you can follow their install instructions [6] to get it. pyenv install 3.8.13 pyenv install 3.10.5 I usually require a virtual environment # [7] I set the PIP...
2 min read

LIVE-REPLAY - Python dev | Markata todoui | 4/6/2022

https://youtu.be/-42A5210HYo Super fun steam Broadcasted live on Twitch – Watch live at https://www.twitch.tv/waylonwalker We worked on markata todoui, a command tui trello board written in python using only markdown files to store the data. I love markdown and I want to make this my workflow. During this stream we get RAIDED by TEEJ_DV! and chat about tmux a bit before calling the changes to markata-tui good and signing off. - dotfiles: https://github.com/WaylonWalker/devtainer - today’s project: https://github.com/WaylonWalker/markata-todoui - website: https://waylonwalker.com/

I really like the super clean look of no status menus, no url bar, no bookmarks bar, nothing. Don’t get me wrong these things are useful, but honestly they take up screen real estate and I RARELY look at them. What I really want is a toggle hotkey. I found this one from one of DT’s youtube video’s. I can now tap xx and both the status bar at the botton and the address bar at the top disappear.

# ~/.config/qutebrowser/config.py

config.bind("xb", "config-cycle statusbar.show always never")
config.bind("xt", "config-cycle tabs.show always never")
config.bind(
    "xx",
    "config-cycle statusbar.show always never;; config-cycle tabs.show always never",
)

When you first start qutebrowser It will create some config files in your home directory for you, but they will be empty.

Config #

As far as I know qutebrowser will create this default config out of the box for you, if it doesn’t, then somehow it just appeared for me 😁.

❯ tree ~/.config/qutebrowser
/home/waylon/.config/qutebrowser
├── autoconfig.yml
├── bookmarks
│   └── urls
├── config.py
├── greasemonkey
└── quickmarks

2 directories, 5 files

Why convert #

You might want to confvert if you are more comfortable with the python config, or if like me you just want config in one place and you are stealing configuration options from others who have thiers in config.py.

Convert to py #

I am getting ready to do some timeseries analysis on a git repo with python, my first step is to figure out a way to list all of the git commits so that I can analyze each one however I want. The GitPython library made this almost trivial once I realized how.

from git import Repo

repo = Repo('.')
commits = repo.iter_commits()

This returns a generator, if you are iterating over them this is likely what you want.

commits
# <generator object Commit._iter_from_process_or_stream at 0x7f3307584510>

The generator will return git.Commit objects with lots of information about each commit such as hexsha, author, commited_datetime, gpgsig, and message.

next(commits)
# <git.Commit "d125317892d0fab10a36638a2d23356ba25c5621">

GitPython is a python api for your git repos, it can be quite handy when you need to work with git from python.

Use Case #

I recently made myself a handy tool for making screenshots in python and it need to do a git commit and push from within the script. For this I reached for GitPython.

How I Quickly Capture Screenshots directly into My Blog

Installation #

GitPython is a python library hosted on pypi that we will want to install into our virtual environments using pip.

pip install GitPython

Create a Repo Object #

Import Repo from the git library and create an instance of the Repo object by giving it a path to the directory containing your .git directory.

from git import Repo
repo = Repo('~/git/waylonwalker.com/')

Two interfaces #

from the docs

It provides abstractions of git objects for easy access of repository data, and additionally allows you to access the git repository more directly using either a pure python implementation, or the faster, but more resource intensive git command implementation.

I only needed to use the more intensive but familar to me git command implementation to get me project off the ground. There is a good tutorial to get you started with their pure python implementation in their docs.

Status #

Requesting the git status can be done as follows.

note I have prefixed my commands with »> to distinguish between the command I entered and the output.

>>> print(repo.git.status())

On branch main
Your branch is ahead of 'origin/main' by 1 commit.
  (use "git push" to publish your local commits)

Untracked files:
  (use "git add <file>..." to include in what will be committed)
        blog/

You can even pass in flags that you would pass into the cli.

>>> print(repo.git.status("-s"))

<!--markata-attribution-->
?? blog/

log #

Example of using the log.

print(repo.git.log('--oneline', '--graph'))

* 0d28bd8 fix broken image link
* 3573928 wip screenshot-to-blog
* fed9abc wip screenshot-to-blog
* d383780 update for wsl2
* ad72b14 wip screenshot-to-blog
* 144c2f3 gratitude-180

Find Deleted Files #

We can even do things like find all files that have been deleted and the hash they were deleted.

print(repo.git.log('--diff-filter', 'D', '--name-only', '--pretty=format:"%h"'))

git find deleted files

full post on finding deleted files

My Experience #

This library seemed pretty straightforward and predicatable once I realized there were two main implementations and that I would already be familar with the more intensive git command implementation.

How I Quickly Capture Screenshots directly into My Blog

When I am creating blog posts it’s often helpful to add screenshots to them to illustrate what I see on my screen. Sometimes I lack good screenshots in my posts because it just takes more effort than I have in the moment, and I prioritize making content over making perfect content. Making Screenshots # [1] When I have something to take a screenshot of, I need to take the shot, optimize the image, often convert it to a better format, publish it, and create a the img tag in my blog. - take screenshot - optimize - conversion - publish - create img tag Created in 🐍Python # [2] I created this tool for myself in python because that is what I am most familiar with, but realistically most of what I am calling are shell scripts that I could do in just about any language. Install my screenshot tool # [3] My screenshot tool is quite hacky and not configurable, but works wonderfully for me. If you like it and want to use it, make it configurable or fork it. For now it lives on GitHub...
3 min read

Copier < 6.0.0b0 considered dangerous

Copier is a fantastic templating library written in python, but older versions have a dangerous bug if you are using it inside of existing directories. !!UPDATE # [1] As of May 15, 2022, the stable release of copier now includes these changes, if you have not already make sure you update. This is a PSA # [2] I Use copier several times per day and get fantastic benefit from this project, this post is not intended to crap all over copier in any way, but is rather a PSA for other users who do use copier like I do so that they know the dangers of using copier inside an existing directory. The issue # [3] The fix # [4] https://github.com/copier-org/copier/pull/273 As of the time of writing this version is still in beta, if you still want to use copier with existing directtories, I’d strongly encourage you to install the --pre release. pipx install copier --pip-args='--pre' confirm # [5] copier --version # copier 6.0.0b0 My update commit # [6] https://github.com/WaylonWalker/de...

Python, click install

Edit the System Environment Variables

Environment Variables button

Add the following path to your users Path Variable

C:\Program Files (x86)\Common Files\Oracle\Java\javapath;C:\WINDOWS\system32;C:\WINDOWS;C:\WINDOWS\System32\Wbem;C:\WINDOWS\System32\WindowsPowerShell\v1.0\;C:\WINDOWS\System32\OpenSSH\;C:\Program Files (x86)\NVIDIA Corporation\PhysX\Common;C:\Program Files\NVIDIA Corporation\NVIDIA NvDLISR;C:\Program Files\dotnet\;C:\Users\quadm\AppData\Local\Packages\PythonSoftwareFoundation.Python.3.10_qbz5n2kfra8p0\LocalCache\local-packages\Python310\Scripts;

PyOhio CFP's

Here are some CFP’s that I used for PyOhio 2022. https://pretalx.com/pyohio-2022/cfp Idea to blog post in minutes - Shorter # [1] Markata is a plugins all the way down static site generator, that covers all the things you need to go from markdown to a blog site out of the box. Since it’s plugins all the way down you can also rip out all the default plugins, and do something completely different with the lifecycle. Lets build a whole blog site in 5 minutes. Add Kedro to your Pandas Workflow - Short # [2] Sometimes python scripts/notebooks take a long time to run, let kedro automatically save your datasets so that you can maintain your production code with ease. Lets take a pipeline with an issue 30 minutes in and solve the issue in 5 mintues. References: [1]: #idea-to-blog-post-in-minutes---shorter [2]: #add-kedro-to-your-pandas-workflow---short

Sometimes you just want python to do something else when you hit an exception, maybe that’s fire a text, slack message, email, or system notification like I wanted.

I am working on a quick and dirty python script designed to take screenshots and land them on my website in a single hotkey. With it being designed to run with a hotkey, if it were to error I would not see it.

I could have gone down a logging route, but honestly this is meant to be quick, dirty, and work on my system for me. I just want to get it in my system notification.

sys.excepthook #

Python exposes sys.excepthook for just this case. Here is what I ended up doing to fire a system notification as well as printing the message. Yaya a log would be mroe appropriate, but this is designed to just get done quick and do the job I want it to do.

def notify_exception(type, value, tb):
    traceback_details = "\n".join(traceback.extract_tb(tb).format())

    msg = f"caller: {' '.join(sys.argv)}\n{type}: {value}\n{traceback_details}"
    print(msg)
    Popen(
        f'notify-send "screenshot.py hit an exception" "{msg}" -a screenshot.py',
        shell=True,
    )


sys.excepthook = notify_exception
0 / 0

pygame events are stored in a queue, by default the most suggested way shown in all tutorials “pumps” the queue, which removes all the messages.

start up pygame #

You don’t necessarily need a full boilerplate to start looking at events, you just just need to pygame.init() and to capture any keystrokes you need a window to capture them on, so you will need a display running.

import pygame
pygame.init()
pygame.display.set_mode((854, 480))

get some events #

Let’s use pygames normal event.get method to get events.

events = pygame.event.get()

printing the events reveal this

[
    <Event(1541-JoyDeviceAdded {'device_index': 0, 'guid': '030000005e0400008e02000010010000'})>,
    <Event(4352-AudioDeviceAdded {'which': 0, 'iscapture': 0})>,
    <Event(4352-AudioDeviceAdded {'which': 1, 'iscapture': 0})>,
    <Event(4352-AudioDeviceAdded {'which': 2, 'iscapture': 0})>,
    <Event(4352-AudioDeviceAdded {'which': 0, 'iscapture': 1})>,
    <Event(4352-AudioDeviceAdded {'which': 1, 'iscapture': 1})>,
    <Event(32774-WindowShown {'window': None})>,
    <Event(32777-WindowMoved {'x': 535, 'y': 302, 'window': None})>,
    <Event(32770-VideoExpose {})>,
    <Event(32776-WindowExposed {'window': None})>,
    <Event(32788-WindowTakeFocus {'window': None})>,
    <Event(32768-ActiveEvent {'gain': 1, 'state': 1})>,
    <Event(32785-WindowFocusGained {'window': None})>,
    <Event(768-KeyDown {'unicode': 'a', 'key': 97, 'mod': 0, 'scancode': 4, 'window': None})>,
    <Event(771-TextInput {'text': 'a', 'window': None})>,
    <Event(768-KeyDown {'unicode': 's', 'key': 115, 'mod': 0, 'scancode': 22, 'window': None})>,
    <Event(771-TextInput {'text': 's', 'window': None})>,
    <Event(769-KeyUp {'unicode': 'a', 'key': 97, 'mod': 0, 'scancode': 4, 'window': None})>,
    <Event(768-KeyDown {'unicode': 'd', 'key': 100, 'mod': 0, 'scancode': 7, 'window': None})>,
    <Event(771-TextInput {'text': 'd', 'window': None})>,
    <Event(769-KeyUp {'unicode': 's', 'key': 115, 'mod': 0, 'scancode': 22, 'window': None})>,
    <Event(769-KeyUp {'unicode': 'd', 'key': 100, 'mod': 0, 'scancode': 7, 'window': None})>,
    <Event(768-KeyDown {'unicode': 'f', 'key': 102, 'mod': 0, 'scancode': 9, 'window': None})>,
    <Event(771-TextInput {'text': 'f', 'window': None})>,
    <Event(769-KeyUp {'unicode': 'f', 'key': 102, 'mod': 0, 'scancode': 9, 'window': None})>,
    <Event(768-KeyDown {'unicode': 's', 'key': 115, 'mod': 0, 'scancode': 22, 'window': None})>,
    <Event(771-TextInput {'text': 's', 'window': None})>,
    <Event(768-KeyDown {'unicode': 'd', 'key': 100, 'mod': 0, 'scancode': 7, 'window': None})>,
    <Event(771-TextInput {'text': 'd', 'window': None})>,
    <Event(769-KeyUp {'unicode': 's', 'key': 115, 'mod': 0, 'scancode': 22, 'window': None})>,
    <Event(769-KeyUp {'unicode': 'd', 'key': 100, 'mod': 0, 'scancode': 7, 'window': None})>,
    <Event(768-KeyDown {'unicode': 'f', 'key': 102, 'mod': 0, 'scancode': 9, 'window': None})>,
    <Event(771-TextInput {'text': 'f', 'window': None})>,
    <Event(768-KeyDown {'unicode': 'a', 'key': 97, 'mod': 0, 'scancode': 4, 'window': None})>,
    <Event(771-TextInput {'text': 'a', 'window': None})>,
    <Event(769-KeyUp {'unicode': 'f', 'key': 102, 'mod': 0, 'scancode': 9, 'window': None})>,
    <Event(768-KeyDown {'unicode': 's', 'key': 115, 'mod': 0, 'scancode': 22, 'window': None})>,
    <Event(771-TextInput {'text': 's', 'window': None})>,
    <Event(769-KeyUp {'unicode': 'a', 'key': 97, 'mod': 0, 'scancode': 4, 'window': None})>,
    <Event(768-KeyDown {'unicode': 'd', 'key': 100, 'mod': 0, 'scancode': 7, 'window': None})>,
    <Event(771-TextInput {'text': 'd', 'window': None})>,
    <Event(769-KeyUp {'unicode': 's', 'key': 115, 'mod': 0, 'scancode': 22, 'window': None})>,
    <Event(769-KeyUp {'unicode': 'd', 'key': 100, 'mod': 0, 'scancode': 7, 'window': None})>,
    <Event(768-KeyDown {'unicode': 'f', 'key': 102, 'mod': 0, 'scancode': 9, 'window': None})>,
    <Event(771-TextInput {'text': 'f', 'window': None})>,
    <Event(769-KeyUp {'unicode': 'f', 'key': 102, 'mod': 0, 'scancode': 9, 'window': None})>,
    <Event(768-KeyDown {'unicode': 'a', 'key': 97, 'mod': 0, 'scancode': 4, 'window': None})>,
    <Event(771-TextInput {'text': 'a', 'window': None})>,
    <Event(768-KeyDown {'unicode': 's', 'key': 115, 'mod': 0, 'scancode': 22, 'window': None})>,
    <Event(771-TextInput {'text': 's', 'window': None})>,
    <Event(768-KeyDown {'unicode': 'd', 'key': 100, 'mod': 0, 'scancode': 7, 'window': None})>,
    <Event(771-TextInput {'text': 'd', 'window': None})>,
    <Event(769-KeyUp {'unicode': 'a', 'key': 97, 'mod': 0, 'scancode': 4, 'window': None})>,
    <Event(769-KeyUp {'unicode': 's', 'key': 115, 'mod': 0, 'scancode': 22, 'window': None})>,
    <Event(769-KeyUp {'unicode': 'd', 'key': 100, 'mod': 0, 'scancode': 7, 'window': None})>,
    <Event(768-KeyDown {'unicode': 'f', 'key': 102, 'mod': 0, 'scancode': 9, 'window': None})>,
    <Event(771-TextInput {'text': 'f', 'window': None})>,
    <Event(769-KeyUp {'unicode': 'f', 'key': 102, 'mod': 0, 'scancode': 9, 'window': None})>,
    <Event(768-KeyDown {'unicode': 's', 'key': 115, 'mod': 0, 'scancode': 22, 'window': None})>,
    <Event(771-TextInput {'text': 's', 'window': None})>,
    <Event(769-KeyUp {'unicode': 's', 'key': 115, 'mod': 0, 'scancode': 22, 'window': None})>,
    <Event(768-KeyDown {'unicode': 'd', 'key': 100, 'mod': 0, 'scancode': 7, 'window': None})>,
    <Event(771-TextInput {'text': 'd', 'window': None})>,
    <Event(769-KeyUp {'unicode': 'd', 'key': 100, 'mod': 0, 'scancode': 7, 'window': None})>,
    <Event(768-KeyDown {'unicode': 'f', 'key': 102, 'mod': 0, 'scancode': 9, 'window': None})>,
    <Event(771-TextInput {'text': 'f', 'window': None})>,
    <Event(769-KeyUp {'unicode': 'f', 'key': 102, 'mod': 0, 'scancode': 9, 'window': None})>,
    <Event(768-KeyDown {'unicode': 's', 'key': 115, 'mod': 0, 'scancode': 22, 'window': None})>,
    <Event(771-TextInput {'text': 's', 'window': None})>,
    <Event(769-KeyUp {'unicode': 's', 'key': 115, 'mod': 0, 'scancode': 22, 'window': None})>,
    <Event(768-KeyDown {'unicode': 'd', 'key': 100, 'mod': 0, 'scancode': 7, 'window': None})>,
    <Event(771-TextInput {'text': 'd', 'window': None})>,
    <Event(769-KeyUp {'unicode': 'd', 'key': 100, 'mod': 0, 'scancode': 7, 'window': None})>,
    <Event(768-KeyDown {'unicode': '', 'key': 1073742051, 'mod': 1024, 'scancode': 227, 'window': None})>,
    <Event(772-Unknown {})>,
    <Event(769-KeyUp {'unicode': '', 'key': 1073742051, 'mod': 0, 'scancode': 227, 'window': None})>,
    <Event(32768-ActiveEvent {'gain': 0, 'state': 1})>,
    <Event(32786-WindowFocusLost {'window': None})>,
    <Event(772-Unknown {})>
]

Lets get some more events. #

Let’s say that we have multpile sprites all asking for the events from different places in our game. If we assume that our game loop runs very fastand we get events one after another the second one will have no events.

events_one = pygame.event.get()
events_two = pygame.event.get()

printing the events reveals that there are no events, well i

[]

Making things more maddening #

Even simple games don’t quite run infinitely fast there is some delay, with this delay most events will go to event_one, while any that occur in the short time between event_one and two will be in event_two’s queue.

import time
events_one = pygame.event.get()
time.sleep(.05) # simulating some delay that would naturally occur
events_two = pygame.event.get()

How to Resolve this #

Store events for each frame in memory.

Pump #

I thought pump=False would be the answer I was looking for, but I was proven wrong. It does not behave intuitivly to me.

events_one = pygame.event.get(pump=False) # all events since last pump
events_two = pygame.event.get(pump=False) # no events
events_three = pygame.event.get() # all events since last pump

events_one and events_three will have a list of events, while events_two will be empty. It seems that pump=False leaves the events there for the next event.get(), but appears cleared to any event.get(pump=False).

Keep a Game State #

If you want objects to do their own event handling, outside of the main game, you will need to give them some game state with the events in it. However you decide, you may only call event.get() once per game loop otherwise weird things will happen.

One of the most essential concepts of pygame to start making a game you will need to understand is loading images and blitting them to the screen.

blit stands for block image transfer, to me it feels a lot like layering up layers/images in photoshop or Gimp.

Loading an image #

I started by making a spotlight in Gimp, by opening a 64x64 pixel image and painting the center with a very soft brush.

the spotlight I created in gimp

This is what it looks like

Now we can load this into pygame.

import pygame
img = pygame.image.load("assets/spotlight.png")

Converting to the pygame colorspace #

To make pygame a bit more efficient we can convert the image to pygames colorspace once when we load it rather than every time we blit it onto another surface.

import pygame

# convert full opaque images
img = pygame.image.load("assets/spotlight.png").convert()

# convert pngs with transparancy
img = pygame.image.load("assets/spotlight.png").convert_alpha()

blitting #

To display the image onto the screen we need to use the blit method which needs at least two arguments, something to blit and a position to blit it at.

screen = pygame.display.set_mode(self.screen_size)
screen.blit( img, (0, 0),)

note blitting to the position (0, 0) will align the top left corners of the object we are blitting onto (screen) and the object we are blitting (img).

Starter #

Now we need an actual game running to be able to put on the screen. I am using my own starter/boilerplate, if you want to follow along you can install it from github into your own virtual environment.

pip install git+https://github.com/WaylonWalker/pygame-starter

Pygame Boilerplate Apr 2022

You can read more about my starter in this post

Let’s place this image right in the middle #

Now we can use the starter to create a new game, and with just a bit of offset we can put the spotlight directly in the middle.

import pygame
from pygame_starter import Game


class MyGame(Game):
    def __init__(self):
        super().__init__()
        # load in the image one time and store it inside the object instance
        self.img = pygame.image.load("assets/spotlight.png").convert_alpha()
    def game(self):
        # fill the screen with aqua
        self.screen.fill((128, 255, 255))
        # transfer the image to the middle of the screen
        self.screen.blit(
            self.img,
            (
                self.screen_size[0] / 2 - self.img.get_size()[0],
                self.screen_size[1] / 2 - self.img.get_size()[1],
            ),
        )


if __name__ == "__main__":
    game = MyGame()
    game.run()

If we save this as load_and_blit.py we can run it at the command like as so.

python load_and_blit.py

And we should get the following results.

the results of putting the image in the middle

convert a transparent png #

What happens when we accidently use .convert() rather than .convert_alpha()?

using convert on a transparant png gets rid of all transparancy and fills with black

Making snow #

A common concept in pygame, that is built into my starter, is that you typically want to reset the screen each and every frame. Building on this with our new concept of blitting spotlights onto the screen we can make a random noise of snow by blitting a bunch of images to the screen.

import random

import pygame
from pygame_starter import Game


class MyGame(Game):

    def __init__(self):
        super().__init__()
        self.img = pygame.image.load("assets/spotlight.png").convert_alpha()

    def game(self):
        self.screen.fill((128, 255, 255))
        for  in range(100):
            self.screen.blit(
                self.img,
                (
                    random.randint(0, self.screen_size[0]) - self.img.get_size()[0],
                    random.randint(0, self.screen_size[1]) - self.img.get_size()[1],
                ),
            )


if __name__ == "__main__":
    game = MyGame()
    game.run()

the results #

snow falling down the screen

Dunk is a beautiful git diff tool built on top of rich.

Browsing through twitter the other day I discovered it through this tweet by _darrenburns.

https://twitter.com/_darrenburns/status/1510350016623394817

Dunk is beta #

Before I dive in deep, I do want to mention that Dunk is super new and beta at this point. I am making it my default pager, because I know what I am doing and can quickly shift back if I need to, no sweat. If you are a little less comfortable with the command line, terminal, or reading any issues that might come up, it might be best if you just pipe into Dunk when you want to use it.

The author really cautions the use of it as your default pager this early, I’m just showing that it’s possible, and I’m trying it.

He notes that it might have some issues especially with partially staged files.

try it #

You can try it with pipx.

git diff | pipx run dunk

install it #

If you like it, you can install it with pip or pipx, I prefer pipx for cli applications like this.

pipx install dunk

set it as your default pager #

You can configure dunk as your default pager with the command line, or by editing your .gitconfig file.

git config --global pager.diff "dunk | less -R`
[pager]
    diff = dunk | less -R

As pointed out by _darrenburns dunk is not a pager and you can gain back all of the benefits of using a pager by piping into less with the -R flag.

reset it if you don’t like it #

You can --unset your pager configuration from the command line or edit your .gitconfig file by hand to remove the lines shown above.

git config --global --unset pager.diff

Comparison #

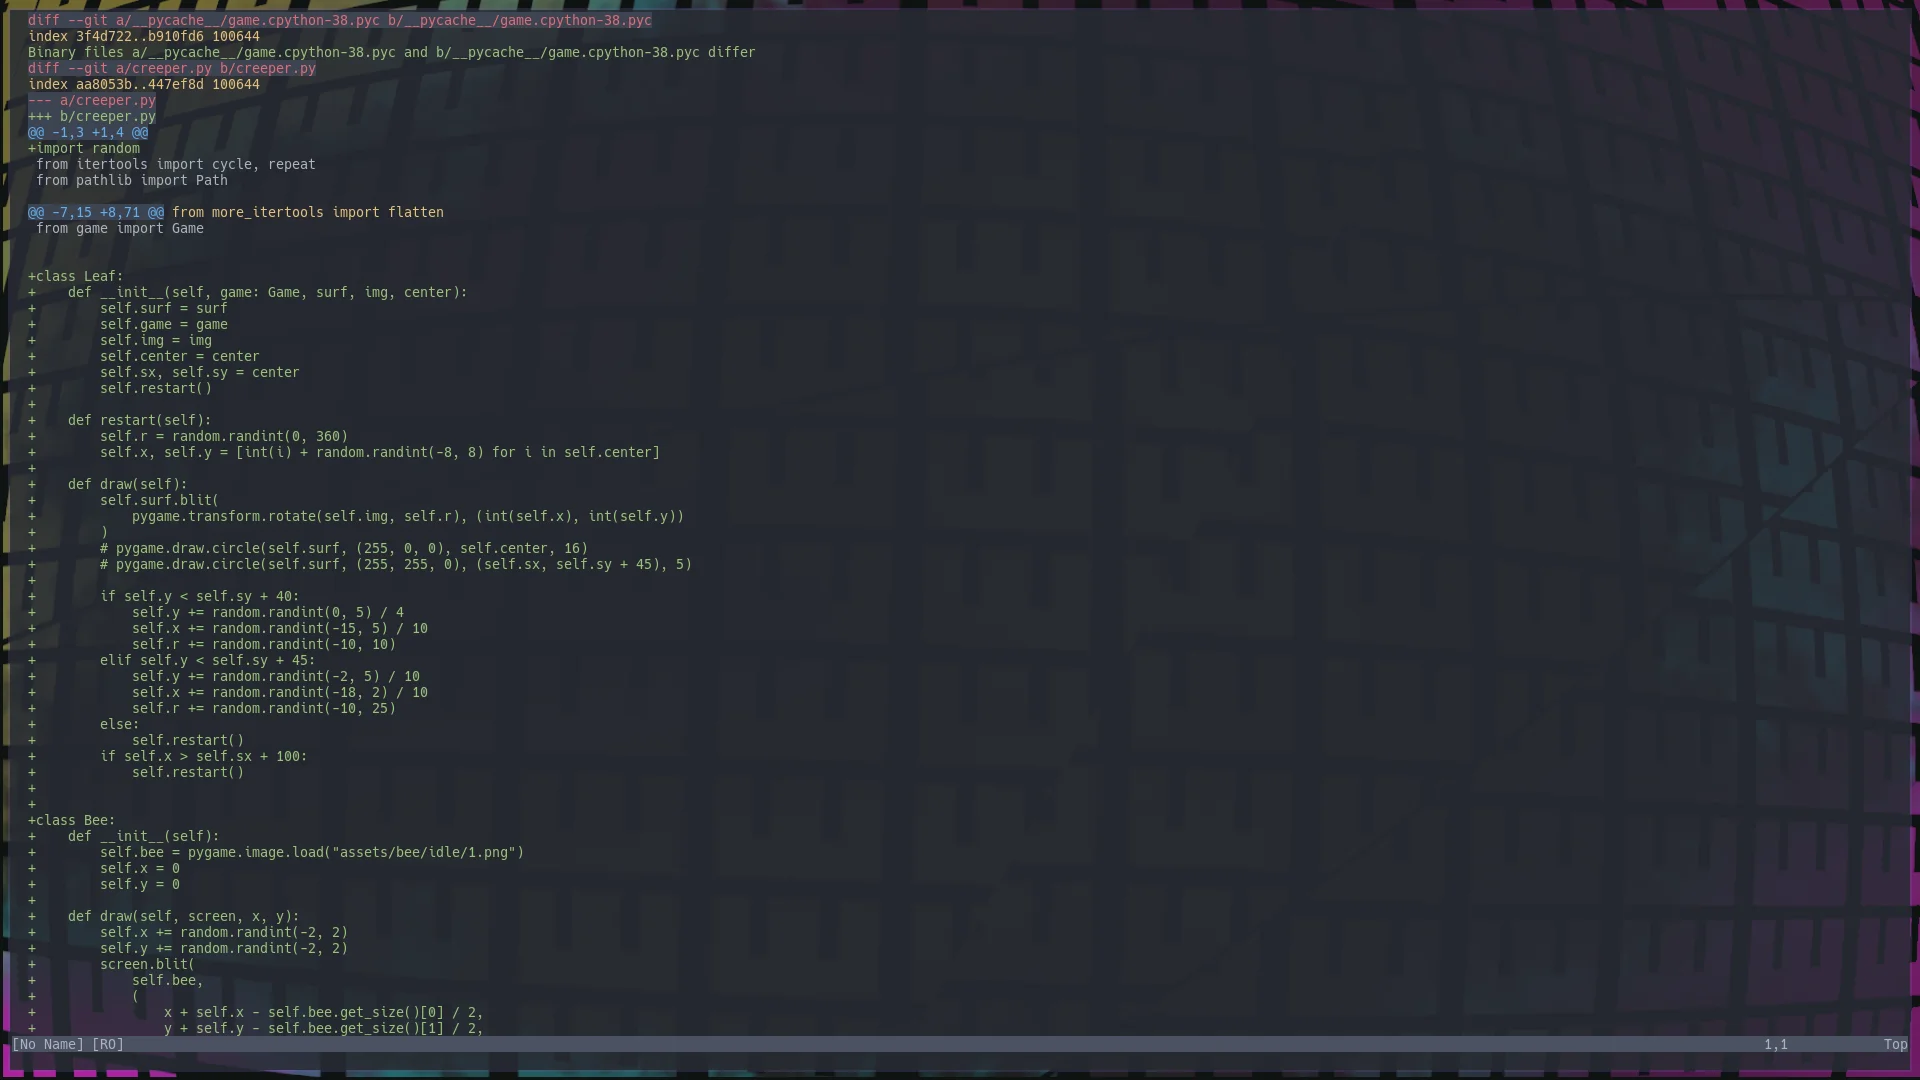
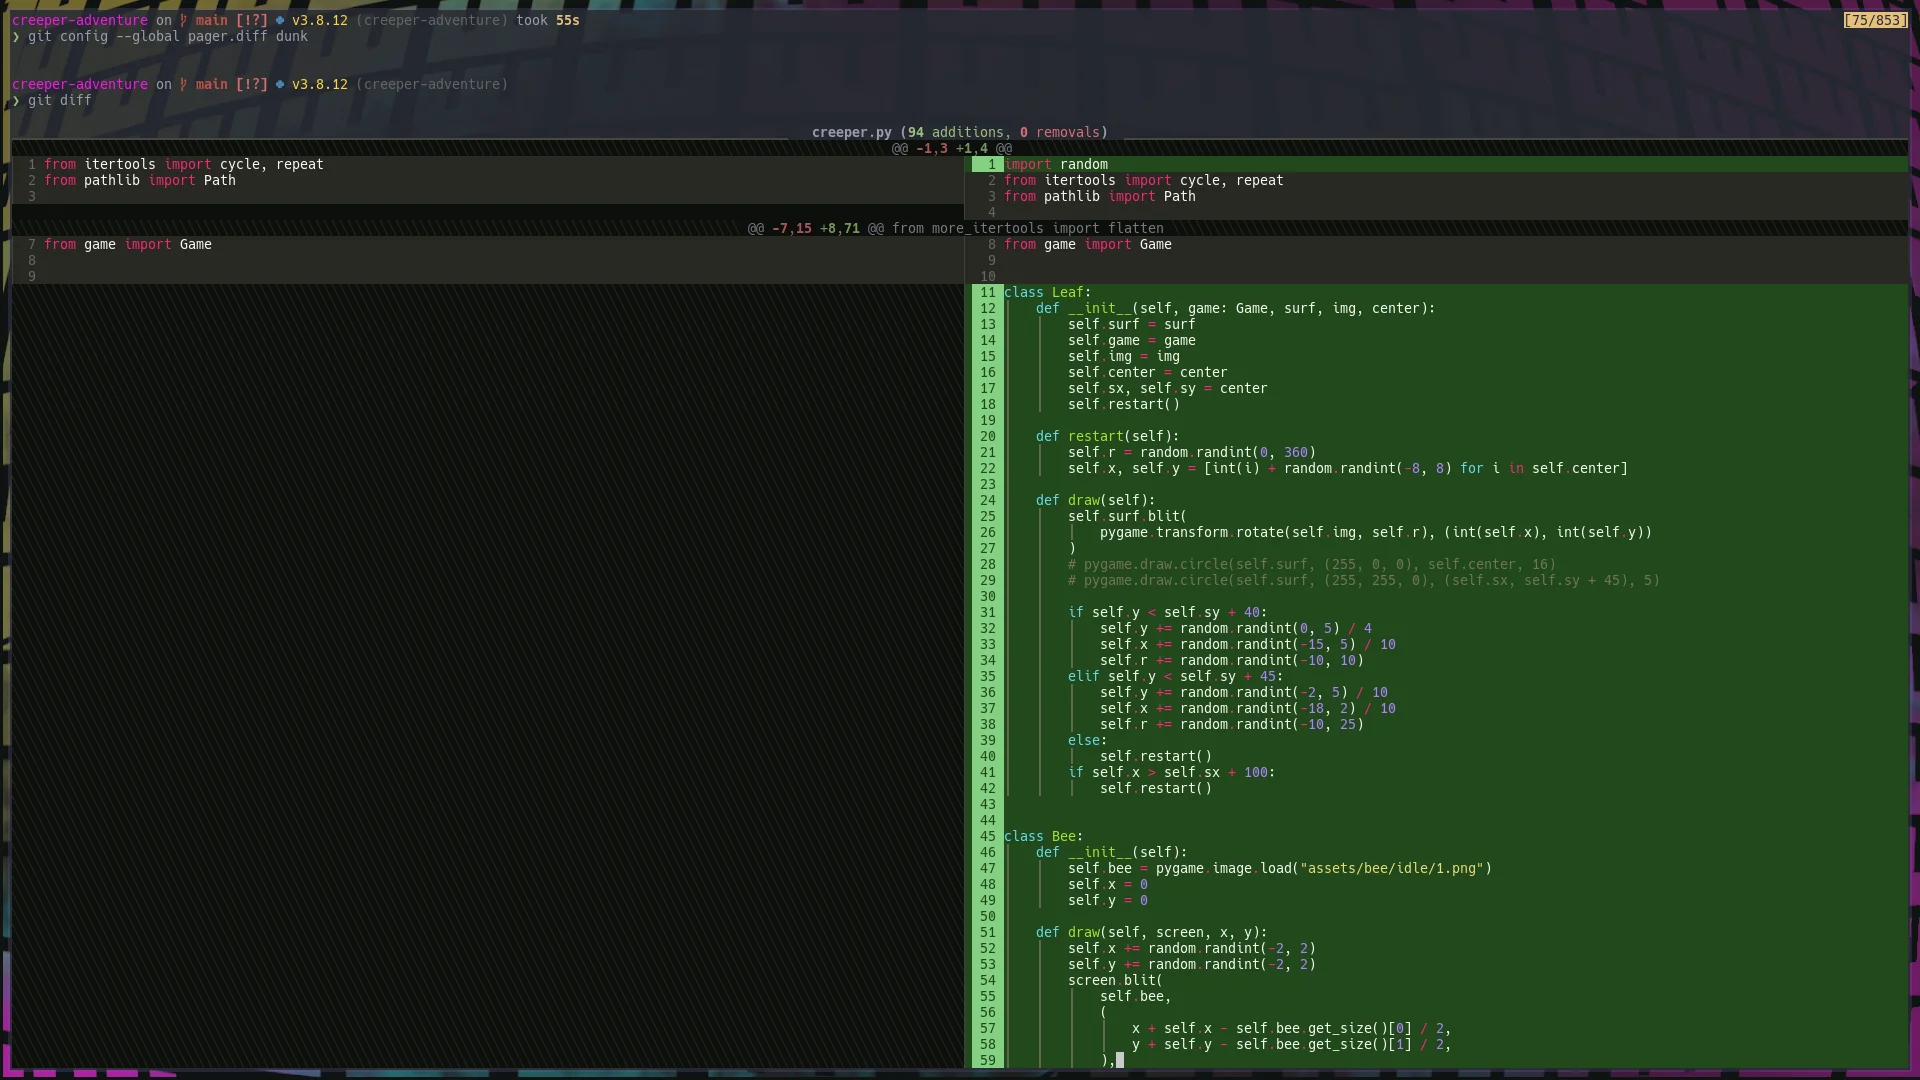
I have some edits to a game my son and I are working on unstaged so I ran git diff on that project with and without dunk to compare the differences.

default diff

Dunk just looks so good.

dunk diff

Always install #

If you follow along here often you know that I am a big fan of installing all my tools in an ansible playbook so that I don’t suffer configuring a new machine for months after getting it and wondering why its not exactly like the last.

# Dunk - prettier git diffs
# https://github.com/darrenburns/dunk
- name: check is dunk installed
  shell: command -v black
  register: dunk_exists
  ignore_errors: yes

- name: install dunk
  when: dunk_exists is failed
  shell: pipx install dunk

[[ ansible-install-if-not-callable ]]

More on conditionally installing tools with ansible in this post.

I’m poking a bit into gamedev. Partly to better understand, partly because it’s stretching different parts of my brain/skillset than writing data pipelines does, but mostly for the experience of designing them with my 9yo Wyatt.

pygame boilerplates #

I’ve seen several pygame boilerplate templates, but they all seem to rely heavily on globl variables. That’s just not how I generally develop anything. I want a package that I can pip install, run, import, test, all the good stuff.

My current starter #

What currently have is a single module starter package that is on github so that I can install it and start building games with very little code.

Installation #

Since it’s a package on GitHub you can install it with the git+ prefix.

pip install git+https://github.com/WaylonWalker/pygame-starter

Example Game #

You can make a quick game by inheriting from Game, and calling .run(). This example just fills the screen with an aqua color, but you can put all of your game logic in the game method.

from pygame_starer import Game

class MyGame(Game):
    def game(self):
        self.screen.fill((128, 255, 255))

if __name__ == "__main__":
    game = MyGame()
    game.run()

The starter #

Here is what the current game.py looks like. I will probably update it as time goes on and I learn more about the things I want to do with it.

from typing import Tuple

import pygame


class Game:
    def __init__(
        self,
        screen_size: Tuple[int, int] = (854, 480),
        caption: str = "pygame-starter",
        tick_speed: int = 60,
    ):
        """

        screen_size (Tuple[int, int]): The size of the screen you want to use, defaults to 480p.
        caption (str): the name of the game that will appear in the title of the window, defaults to `pygame-starter`.
        tick_speed (int): the ideal clock speed of the game, defaults to 60

        ## Example Game

        You can make a quick game by inheriting from Game, and calling
        `.run()`.  This example just fills the screen with an aqua color, but
        you can put all of your game logic in the `game` method.

        ``` python
        from pygame_starer import Game

        class MyGame(Game):
            def game(self):
                self.screen.fill((128, 255, 255))

        if __name__ == "__main__":
            game = MyGame()
            game.run()

        ```
        """
        pygame.init()
        pygame.display.set_caption(caption)

        self.screen_size = screen_size
        self.screen = pygame.display.set_mode(self.screen_size)
        self.clock = pygame.time.Clock()
        self.tick_speed = tick_speed

        self.running = True
        self.surfs = []

    def should_quit(self):
        """check for pygame.QUIT event and exit"""
        for event in pygame.event.get():
            if event.type == pygame.QUIT:
                self.running = False

    def game(self):
        """
        This is where you put your game logic.

        """
        ...

    def reset_screen(self):
        """
        fill the screen with black
        """
        self.screen.fill((0, 0, 0))

    def update(self):
        """
        run one update cycle
        """
        self.should_quit()
        self.reset_screen()
        self.game()
        for surf in self.surfs:
            self.screen.blit(surf, (0, 0))
        pygame.display.update()
        self.clock.tick(self.tick_speed)

    def run(self):
        """
        run update at the specified tick_speed, until exit.
        """
        while self.running:
            self.update()
        pygame.quit()


if __name__ == "__main__":
    game = Game()
    game.run()

My personal Site build went down last week, and I was unable to publish a new article. This is the process I went through to get it back up and running quickly.

Is it a fluke? #

Classic IT fix, rerun it and see if you get the same error. Everyone is busy and when you have your build go down you are probably busy doing something else. My first step is often to simply click rerun right from GitHub actions. Sometimes this will fix it, and sometimes it doesn’t. It’s an easy fix to run in the meantime you are not focused on fixing it.

Is GitHub having issues? #

Also worth a check to see if GitHub is having a hiccup or not. This error felt pretty obviously not GitHub’s fault, but it’s a good one to check when you run into a weird unexplainable error.

Check github status for any downtime issues with actions.

Build Down #

Alright down to the error message I got. The error is pretty obvious that somewhere I am trying to import a non-existing module from click.

Run markata build --no-pretty
Traceback (most recent call last):
  File "/opt/hostedtoolcache/Python/3.8.12/x64/bin/markata", line 33, in <module>
    sys.exit(load_entry_point('markata==0.1.0', 'console_scripts', 'markata')())
  File "/opt/hostedtoolcache/Python/3.8.12/x64/bin/markata", line 25, in importlib_load_entry_point
    return next(matches).load()
  File "/opt/hostedtoolcache/Python/3.8.12/x64/lib/python3.8/importlib/metadata.py", line 77, in load
    module = import_module(match.group('module'))
  File "/opt/hostedtoolcache/Python/3.8.12/x64/lib/python3.8/importlib/__init__.py", line 127, in import_module
    return _bootstrap._gcd_import(name[level:], package, level)
  File "<frozen importlib._bootstrap>", line 1014, in _gcd_import
  File "<frozen importlib._bootstrap>", line 991, in _find_and_load
  File "<frozen importlib._bootstrap>", line 961, in _find_and_load_unlocked
  File "<frozen importlib._bootstrap>", line 219, in _call_with_frames_removed
  File "<frozen importlib._bootstrap>", line 1014, in _gcd_import
  File "<frozen importlib._bootstrap>", line 991, in _find_and_load
  File "<frozen importlib._bootstrap>", line 975, in _find_and_load_unlocked
  File "<frozen importlib._bootstrap>", line 671, in _load_unlocked
  File "<frozen importlib._bootstrap_external>", line 843, in exec_module
  File "<frozen importlib._bootstrap>", line 219, in _call_with_frames_removed
  File "/opt/hostedtoolcache/Python/3.8.12/x64/lib/python3.8/site-packages/markata/__init__.py", line 25, in <module>
    from markata.cli.plugins import Plugins
  File "/opt/hostedtoolcache/Python/3.8.12/x64/lib/python3.8/site-packages/markata/cli/__init__.py", line 1, in <module>
    from .cli import app, cli, make_layout, run_until_keyboard_interrupt
  File "/opt/hostedtoolcache/Python/3.8.12/x64/lib/python3.8/site-packages/markata/cli/cli.py", line 3, in <module>
    import typer
  File "/opt/hostedtoolcache/Python/3.8.12/x64/lib/python3.8/site-packages/typer/__init__.py", line 12, in <module>
    from click.termui import get_terminal_size as get_terminal_size
ImportError: cannot import name 'get_terminal_size' from 'click.termui' (/opt/hostedtoolcache/Python/3.8.12/x64/lib/python3.8/site-packages/click/termui.py)

Check pypi’s release date of click #

So the latest click was released just a few hours before this build. This feels like we are getting somewhere. Either click did a poor job of issuing deprecation warnings, or I was ignoring them in my build pipeline.

click 8.1.0 release date on pypi

pin it and push #

let’s fix this build now

To get the build up and running today so that we don’t stop the flow of new posts I am going to open my requirements.txt file, and pin under the version that was just built.

click<8.1.0

Since I am still busy doing other things that fixing this, and am pretty confident that things were working before, I am just going to commit this and ship it.

watch ci #

Coming back to actions a few minutes later shows the site is building successfully without the same error as before. New posts will now be flowing to the site with the slightly older version of click.

looking for an issue #

Let’s make sure that the issue is going to be resolved. After not being busy and having time to investigate the issue, I can see that typer is the library making the import to get_terminal_size. Lets checkout its GitHub-repo and make sure someone is working on it.

By the time I go to the package that was having this issue there was already an issue up, and PR waiting approval. I gave the Issue a reaction 👍 to signal that I also care, and appreciate the issue author taking time to submit.

I ran into a PR this week where the author was inheriting what BaseException rather than exception. I made this example to illustrate the unintended side effects that it can have.

Try running these examples in a .py file for yourself and try to kill them with control-c.

You cannot Keybard interrupt #

Since things such as KeyboardInterrupt are created as an exception that inherits from BaseException, if you except BaseException you can no longer KeyboardInterrupt.

from time import sleep

while True:
    try:
        sleep(30)
    except BaseException: # ❌
        pass

except from Exception or higher #

If you except from exception or something than inherits from it you will be better off, and avoid unintended side effects.

from time import sleep

while True:
    try:
        sleep(30)
    except Exception: # ✅
        pass

This goes with Custom Exceptions as well #

When you make custom exceptions expect that users, or your team members will want to catch them and try to handle them if they can. If you inherit from BaseException you will put them in a similar situation when they use your custom Exception.

class MyFancyException(BaseException): # ❌
    ...

class MyFancyException(Exception): # ✅
    ...

When I need a consistent key for a pythohn object I often reach for hashlib.md5 It works for me and the use cases I have.

diskcache #

Yesterday we talked about setting up a persistant cache with python diskcache. In order to make this really work we need a good way to make consistent cache keys from some sort of python object.

How I setup a sqlite cache in python

hash #

does not work

My first thought was to just hash the files, this will give me a unique key for each. This will work, and give you a consistant key for one and only one given python process. If you start a new interpreter you will get different keys.

waylonwalker.com on  main [$✘!?] via  v5.1.5  v3.8.0 (waylonwalker.com)
 ipython

waylonwalker main v3.8.0 ipython
 hash("waylonwalker")
-3862245013515310359

waylonwalker main v3.8.0 ipython
 hash("waylonwalker")
-3862245013515310359

waylonwalker main v3.8.0 ipython
 exit

waylonwalker.com on  main [$✘!?] via  v5.1.5  v3.8.0 (waylonwalker.com)
 ipython


waylonwalker main v3.8.0 ipython
 hash("waylonwalker")
-83673051278873734

here is a snapshot of my terminal proving that you can get the same hash in one session, but it changes when you restart ipython.

hashlib.md5 #

Here is a quick couple ipython sessions showing that md5 cache is consistent accross multiple sessions.

waylonwalker.com on  main [$✘!?] via  v5.1.5  v3.8.0 (waylonwalker.com) on  (us-east-1)
 ipython

waylonwalker main v3.8.0 ipython
 hashlib.md5("waylonwalker")
[PYFLYBY] import hashlib
╭─────────────────────────────── Traceback (most recent call last) ────────────────────────────────╮
 <ipython-input-1-1537c4473c74>:1 in <module>                                                     
╰──────────────────────────────────────────────────────────────────────────────────────────────────╯
TypeError: Unicode-objects must be encoded before hashing

waylonwalker main v3.8.0 ipython
 hashlib.md5("waylonwalker".encode("utf-8"))
<md5 HASH object @ 0x7fe4ba6832d0>

waylonwalker main v3.8.0 ipython
 hashlib.md5("waylonwalker".encode("utf-8")).hexdigest()
'1c7c1073ca096ffdb324471770911fe2'

waylonwalker main v3.8.0 ipython
 hashlib.md5("waylonwalker".encode("utf-8")).hexdigest()
'1c7c1073ca096ffdb324471770911fe2'

waylonwalker main v3.8.0 ipython
 hashlib.md5("waylonwalker".encode("utf-8")).hexdigest()
'1c7c1073ca096ffdb324471770911fe2'

waylonwalker main v3.8.0 ipython
 exit


waylonwalker.com on  main [$✘!?] via  v5.1.5  v3.8.0 (waylonwalker.com) on  (us-east-1) took 47s
 ipython

waylonwalker main v3.8.0 ipython
 hashlib.md5("waylonwalker".encode("utf-8")).hexdigest()
[PYFLYBY] import hashlib
'1c7c1073ca096ffdb324471770911fe2'


key for diskcache #

Since it is consistent we can use it as a cache key for diskcache operations. I setup a little funciton that allows me to pass a bunch of differnt things in to cache. As long as the str method exists and is gives the data that you want to cache key on, this will work.

def make_hash(self, *keys: str) -> str:
    str_keys = [str(key) for key in keys]
    return hashlib.md5("".join(str_keys).encode("utf-8")).hexdigest()

understanding python *args and **kwargs

If the *args is confusing, I have a full article on *args and **kwargs.

See it in action #

Here you can see it in action. Anything passed into the function gets to be part of the key.

waylonwalker ↪main v3.8.0 ipython
❯ def make_hash(self, *keys: str) -> str:
...:     str_keys = [str(key) for key in keys]
...:     return hashlib.md5("".join(str_keys).encode("utf-8")).hexdigest()
...:

waylonwalker ↪main v3.8.0 ipython
❯ make_hash(1, "one", "1", 1.0)
'73901d019df012a1cdab826ce301217d'

waylonwalker ↪main v3.8.0 ipython
❯ exit


waylonwalker.com on  main [$✘!?] via  v5.1.5  v3.8.0 (waylonwalker.com) on  (us-east-1) took 19m19s
❯

waylonwalker.com on  main [$✘!?] via  v5.1.5  v3.8.0 (waylonwalker.com) on  (us-east-1)
❯ ipython

waylonwalker ↪main v3.8.0 ipython
❯ def make_hash(self, *keys: str) -> str:
...:     str_keys = [str(key) for key in keys]
...:     return hashlib.md5("".join(str_keys).encode("utf-8")).hexdigest()
[PYFLYBY] import hashlib

waylonwalker ↪main v3.8.0 ipython
❯ make_hash(1, "one", "1", 1.0)
'73901d019df012a1cdab826ce301217d'