Looking for inspiration? kickstart.nvim [1] by nvim-lua [2].
A launch point for your personal nvim configuration
References:
[1]: https://github.com/nvim-lua/kickstart.nvim
[2]: https://github.com/nvim-lua
Publishing rhythm
Check out init.lua [1] by ThePrimeagen [2]. It’s a well-crafted project with great potential.
No description available.
References:
[1]: https://github.com/ThePrimeagen/init.lua
[2]: https://github.com/ThePrimeagen
I’m really excited about mason.nvim [1], an amazing project by williamboman [2]. It’s worth exploring!
Portable package manager for Neovim that runs everywhere Neovim runs. Easily install and manage LSP servers, DAP servers, linters, and formatters.
References:
[1]: https://github.com/williamboman/mason.nvim
[2]: https://github.com/williamboman
I came across mason.nvim [1] from mason-org [2], and it’s packed with great features and ideas.
Portable package manager for Neovim that runs everywhere Neovim runs. Easily install and manage LSP servers, DAP servers, linters, and formatters.
References:
[1]: https://github.com/mason-org/mason.nvim
[2]: https://github.com/mason-org
I like sbidoul’s [1] project hatch-pip-deepfreeze [2].
A hatch virtual environment [3] plugin to lock dependencies with pip-deepfreeze
References:
[1]: https://github.com/sbidoul
[2]: https://github.com/sbidoul/hatch-pip-deepfreeze
[3]: /virtual-environment/
yazgoo [1] has done a fantastic job with vmux [2]. Highly recommend taking a look.
helper for multiplexing terminals with vim/neovim
References:
[1]: https://github.com/yazgoo
[2]: https://github.com/yazgoo/vmux


Give github actions the -e flag in the shebang #! so they fail on any one
command failure. Otherwise each line will set the exit status, but only the
last one will be passed to ci.
#!/bin/bash -e
What is -e #
The -e flag to the bash command allows your script to exit immediately if any command within the script returns a non-zero exit status. This can be useful for ensuring that your script exits with an error if any of the commands it runs fail, which can help you identify and debug issues in your script. For example, if you have a script that runs several commands and one of those commands fails, the script will continue running without the -e flag, but will exit immediately if the -e flag is present. This can make it easier to troubleshoot your script and ensure that it runs correctly.
Solution for Windows #
In windows the solution is not quite as simple. You can define a function in a Windows batch script that wraps an if statement to check the exit status of a command and handle any errors that may have occurred. Here is an example of how you might define a function called “check_error” that does this:
:check_error
if errorlevel 1 (
  echo An error occurred!
  exit /b 1
)
To use this function in your script, you would simply call it after running a command, like this:
some_command
call :check_error
This would run the “some_command” and then call the “check_error” function to check the exit status and handle any errors that may have occurred. This approach allows you to reuse the error-checking logic in your script, which can make it easier to write and maintain.
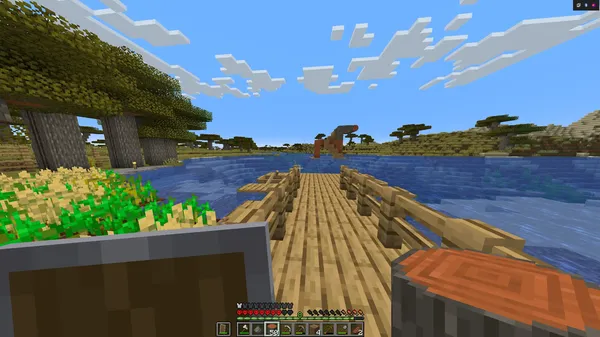
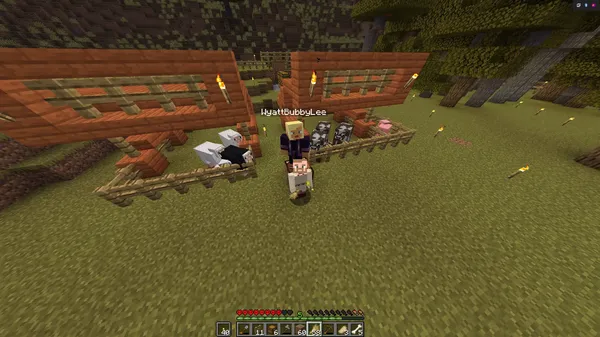
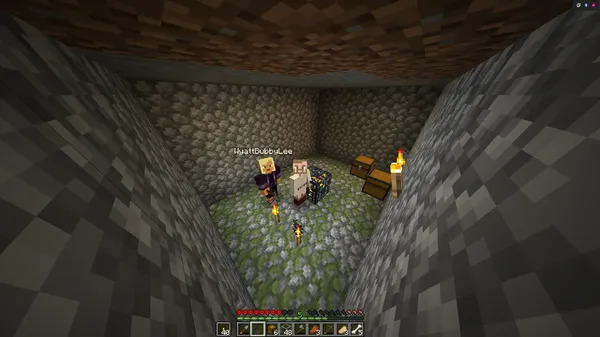
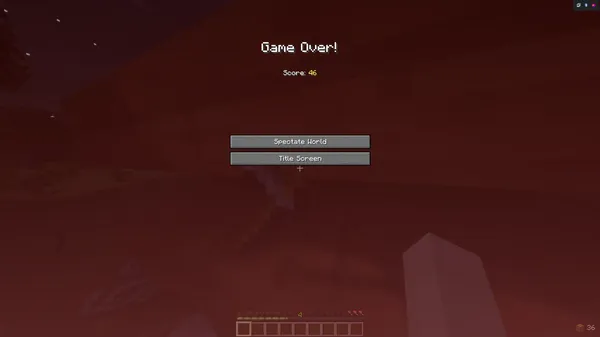
minecraft documentary
This is my first time journaling a Minecraft hardcore world, my son Wyatt is
also documenting his journey in a survival world on
wyattbubbylee.com [1].
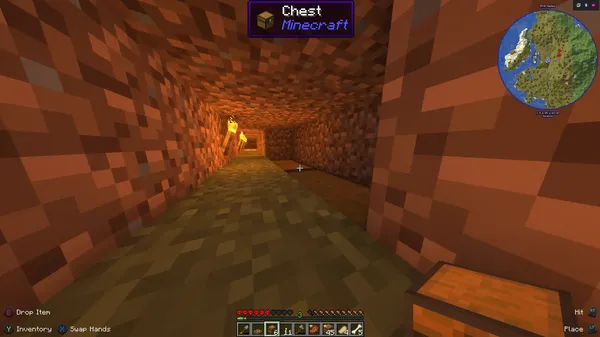
Day 0 # [2]
init
[3]
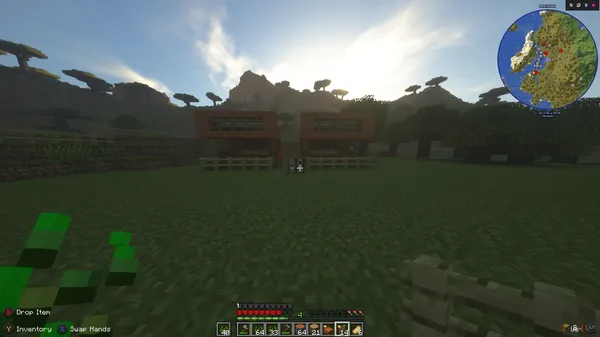
I logged into a brand new hardcore world. I was welcomed by a great Acacia
biome spawn full of resources. I quickly cut my first tree, crafted an axe and
set out to find my first sheep. I was able to find enough sheep for a bed,
several cows and pigs.
I crafted a set of wooden tools, and farmed out a wheat farm till my wooden
hoed died at the shore of a nearby stream. I found a small stone outcropping
in the side of a hill and harvested nearly a full stack of cobblestone from my
first wooden pick.
I ended the first day by sleeping in my bed safe from mobs.
Achievements # [4]
- bed
- furnace
- stone
- wheat farm
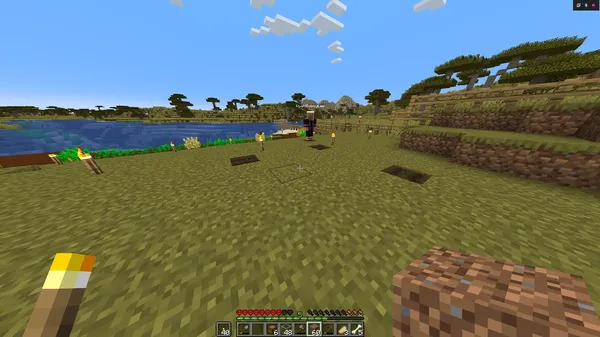
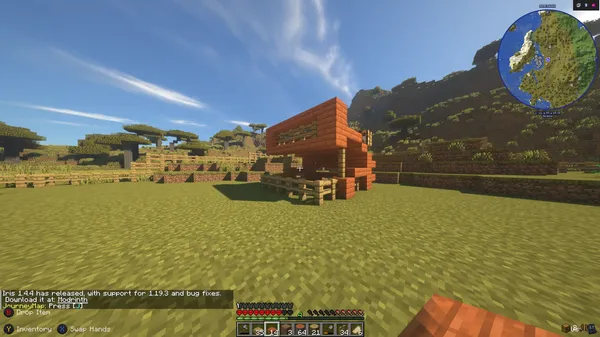
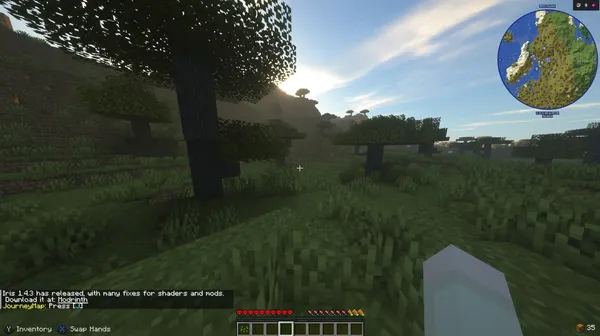
Day 1 # [5]
[6]
Thoughout the course of day one I collected wood and started the framework for
my new house.
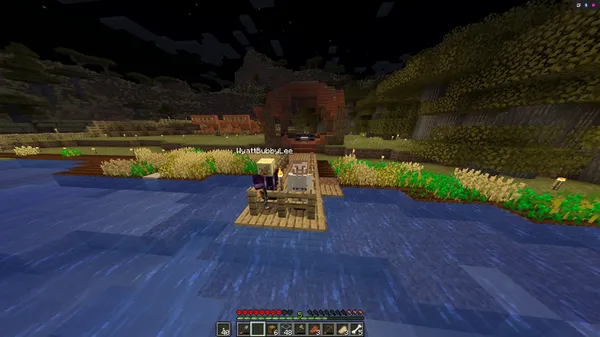
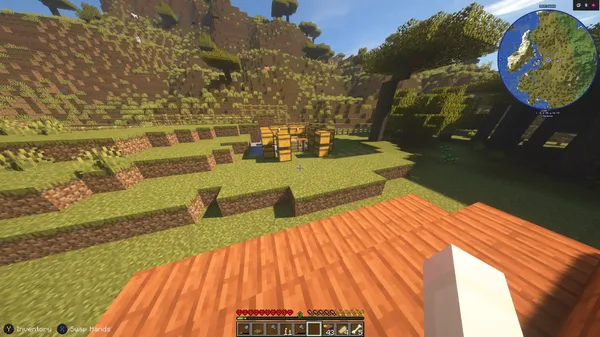
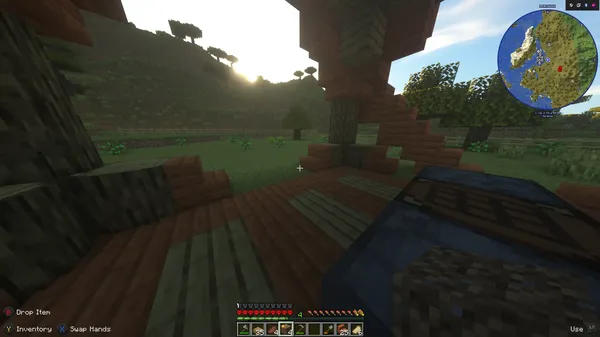
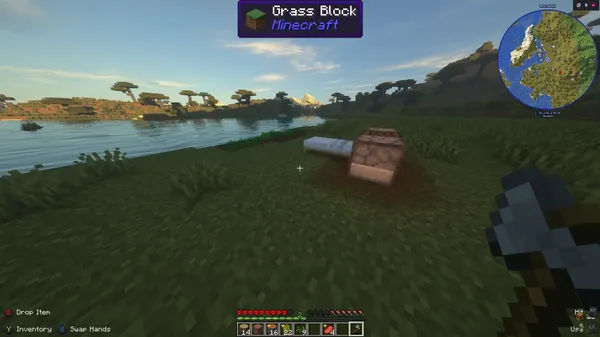
Day 2 # [7]
[8]
The sun sets over the new frame of my house on Day 1
Day two...
Looking for inspiration? sshfs [1] by libfuse [2].
A network filesystem client to connect to SSH servers
References:
[1]: https://github.com/libfuse/sshfs
[2]: https://github.com/libfuse
I recently setup some vm’s on my main machine and got sick of signing in with passwords.
ssh-keygen
ssh-copy-id -i ~/.ssh/id_rsa.pub virt
Moving panes between tmux sessions is something that makes tmux a very flexible and powerful tool. I don’t need this feature very often, but it comes in clutch when you need it.
Pull a pane from any other session #
Using choose-window I was able to come up with a way to select any pane
withing any other session and join it into my current session.
# Choose a pane to join in horizontally
bind f choose-window -Z 'join-pane -h -s "%%"'
Push/Pull from scratch #
I’ve long had this one in my tmux config, I always have a “scratch” session
that I’m running, I often use for looking at things like k9s accross repos
within a popup.
This use case puts a pane into the scratch session, then pulls it back out. I will use this to move a pane between sessions in the rare cases I need to do this.
# push the active pane into the scratch session horizonally
bind -n M-f join-pane -ht scratch
# pull the last active pane from the scratch session horizonally into this session
bind -n M-F join-pane -hs scratch
joehillen [1] has done a fantastic job with sysz [2]. Highly recommend taking a look.
An fzf terminal UI for systemctl
References:
[1]: https://github.com/joehillen
[2]: https://github.com/joehillen/sysz
I like eth-p’s [1] project bat-extras [2].
Bash scripts that integrate bat with various command line tools.
References:
[1]: https://github.com/eth-p
[2]: https://github.com/eth-p/bat-extras
Just starred clipmenu [1] by cdown [2]. It’s an exciting project with a lot to offer.
Clipboard management using dmenu
References:
[1]: https://github.com/cdown/clipmenu
[2]: https://github.com/cdown
I’m impressed by neix [1] from qw3rtty [2].
neix - a RSS/Atom feed reader for your terminal.
References:
[1]: https://github.com/qw3rtty/neix
[2]: https://github.com/qw3rtty
rwhitt2049 [1] has done a fantastic job with df-viewer-poc [2]. Highly recommend taking a look.
No description available.
References:
[1]: https://github.com/rwhitt2049
[2]: https://github.com/rwhitt2049/df-viewer-poc
The work on ansible-vault-pre-commit [1] by pypeaday [2].
pre-commit hook to ensure sensitive info in a repo is encrypted with ansible-vault
References:
[1]: https://github.com/pypeaday/ansible-vault-pre-commit
[2]: https://github.com/pypeaday
The work on PySnooper [1] by cool-RR [2].
Never use print for debugging again
References:
[1]: https://github.com/cool-RR/PySnooper
[2]: https://github.com/cool-RR
I just shared some ssh keys with myself and ran into this error telling me that I did not set the correct permissions on my key.
@@@@@@@@@@@@@@@@@@@@@@@@@@@@@@@@@@@@@@@@@@@@@@@@@@@@@@@@@@@
@         WARNING: UNPROTECTED PRIVATE KEY FILE!          @
@@@@@@@@@@@@@@@@@@@@@@@@@@@@@@@@@@@@@@@@@@@@@@@@@@@@@@@@@@@
Permissions 0750 for '/home/waylon/.ssh/id_*******' are too open.
It is required that your private key files are NOT accessible by others.
This private key will be ignored.
Load key "/home/waylon/.ssh/id_*******": bad Permissions
repo: Permission denied (publickey,gssapi-keyex,gssapi-with-mic).
fatal: Could not read from remote repository.

Please make sure you have the correct access rights
and the repository exists.
I changed them with the following commands.
chmod 644 ~/.ssh/id_*******.pub
chmod 600 ~/.ssh/id_*******
Mr-Destructive [1] has done a fantastic job with djankata [2]. Highly recommend taking a look.
Django + Markata blog starter
References:
[1]: https://github.com/Mr-Destructive
[2]: https://github.com/Mr-Destructive/djankata
Check out nvim [1] by Allaman [2]. It’s a well-crafted project with great potential.
Minimal, blazingly fast, and pure Lua based Neovim configuration for my work as DevOps/Cloud Engineer with batteries included for Python, Golang, and, of course, YAML
References:
[1]: https://github.com/Allaman/nvim
[2]: https://github.com/Allaman
Looking for inspiration? dotfiles [1] by jessarcher [2].
$HOME sweet $HOME
References:
[1]: https://github.com/jessarcher/dotfiles
[2]: https://github.com/jessarcher
With the latest release of version of nvim 0.8.0 we get access to a new winbar feature. One thing I have long wanted somewhere in my nvim is navigation for pairing partners or anyone watching can keep track of where I am. As the driver it’s easy to keep track of the file/function you are in. But when you make big jumps in a few keystrokes it can be quite disorienting to anyone watching, and having this feedback to look at is very helpful.

winbar #
nvim exposes the winbar api in lua, and you can send any text to the winbar as follows.
vim.o.winbar = "here"
You can try it for yourself right from the nvim command line.
:lua vim.o.winbar = "here"
Now you will notice one line above your file with the word here at the very
beginning.
Clearing the winbar #
If you want to clear it out, you can just set it to an empty string or nil.
:lua vim.o.winbar = ""
:lua vim.o.winbar = nil
Setting up nvim-navic #
You will need to install nvim-navic if you want to use it. I added it to my
plugins using Plug as follows.
call plug#begin('~/.local/share/nvim/plugged')
Plug 'SmiteshP/nvim-navic'
call plug#end()
Note!
nvim-navicdoes require the use of the nvim lsp, so if you are not using it then maybe this won’t work for you.
I created an on_attach function long ago, cause that’s what Teej told me to
do. Now I am glad I did, because it made this change super easy.
local function on_attach(client, bufnr)
    if client.server_capabilities.documentSymbolProvider then
        navic.attach(client, bufnr)
    end
end
Then you need to use that on_attach function on all of the lsp’s that you
want navic to work on.
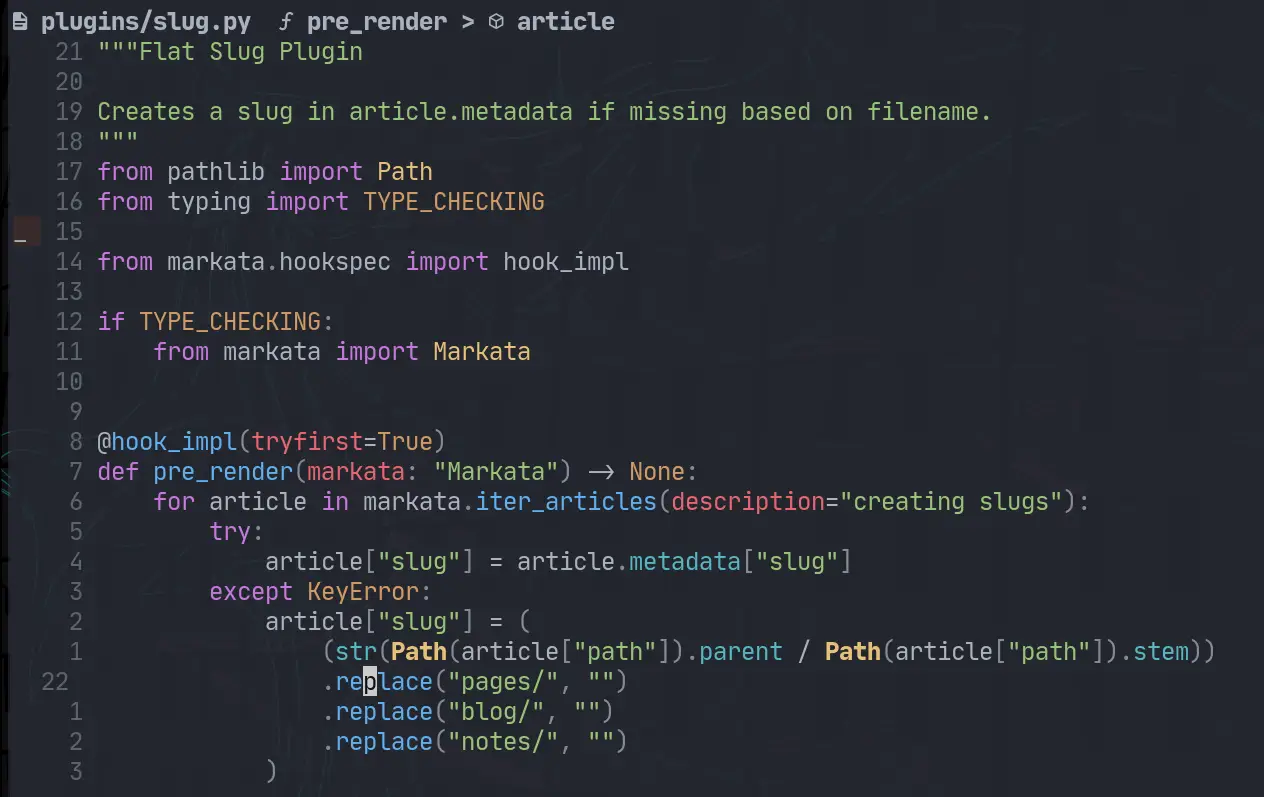
Then in a lua file you need to setup the winbar, for now I put this in my lsp-config settings file, but eventually I want to move my settings to lua and put it there.
vim.o.winbar = " %{%v:lua.vim.fn.expand('%F')%} %{%v:lua.require'nvim-navic'.get_location()%}"
What my winbar looks like #
What I have right now is everything someone who is watching would need to know to navigate to the same place that I am in the project.
waylonwalker/app.py Link > on_click
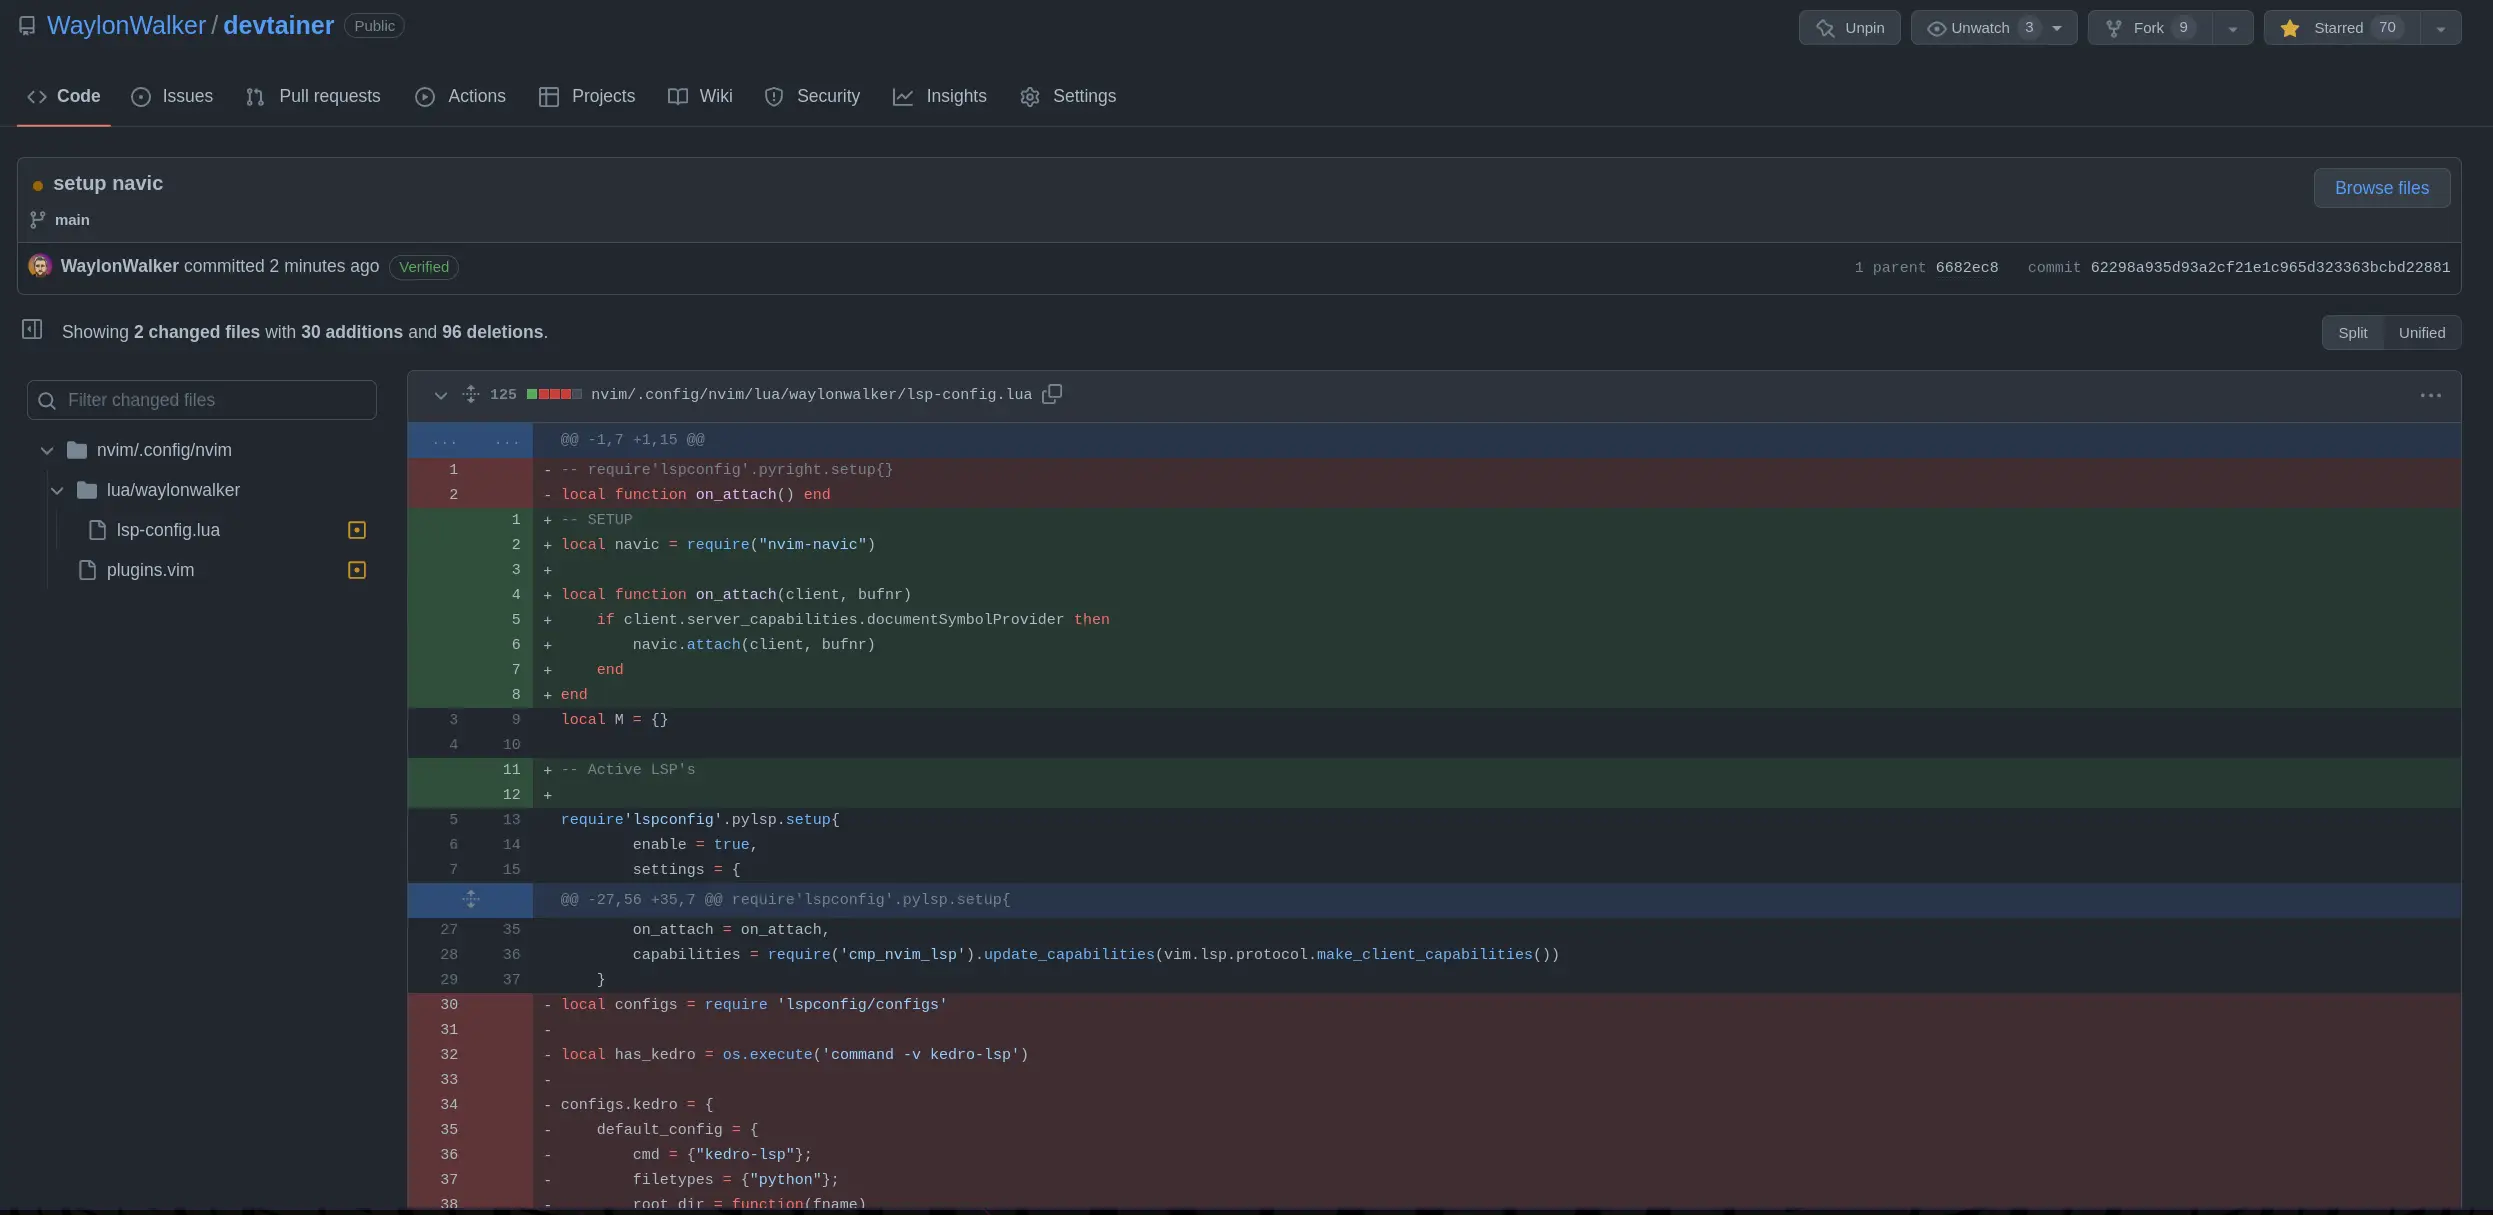
Diff #
Here are the changes that I made to to my plugins list and my lsp-config to get it.
/home/u_walkews/.config/nvim/plugins.vim
call plug#begin('~/.local/share/nvim/plugged')
+Plug 'SmiteshP/nvim-navic'
# /home/u_walkews/.config/nvim/lua/waylonwalker/lsp-config.lua
-local function on_attach() end
+local navic = require("nvim-navic")
+local function on_attach(client, bufnr)
+ if client.server_capabilities.documentSymbolProvider then
+ navic.attach(client, bufnr)
+ end
+end
+
+vim.o.winbar = " %{%v:lua.vim.fn.expand('%F')%} %{%v:lua.require'nvim-navic'.get_location()%}"
GH commit #
If you want to see the change on GitHub, here is the diff
Just starred nvim-navic [1] by SmiteshP [2]. It’s an exciting project with a lot to offer.
Simple winbar/statusline plugin that shows your current code context
References:
[1]: https://github.com/SmiteshP/nvim-navic
[2]: https://github.com/SmiteshP
I came across winbar.nvim [1] from fgheng [2], and it’s packed with great features and ideas.
winbar config for neovim
References:
[1]: https://github.com/fgheng/winbar.nvim
[2]: https://github.com/fgheng
Looking for inspiration? nvim-scrollbar [1] by petertriho [2].
Extensible Neovim Scrollbar
References:
[1]: https://github.com/petertriho/nvim-scrollbar
[2]: https://github.com/petertriho
Looking for inspiration? nvim-hlslens [1] by kevinhwang91 [2].
Hlsearch Lens for Neovim
References:
[1]: https://github.com/kevinhwang91/nvim-hlslens
[2]: https://github.com/kevinhwang91
I came across pre-commit [1] from pre-commit [2], and it’s packed with great features and ideas.
A framework for managing and maintaining multi-language pre-commit hooks.
References:
[1]: https://github.com/pre-commit/pre-commit
[2]: https://github.com/pre-commit
I really like having global cli command installed with pipx. Since textual
0.2.x (the css release) is out I want to be able to pop into textual devtools
easily from anywhere.

Pipx Install #
You can pipx install textual.
pipx install textual
But if you try to run any textual cli commands you will run into a
ModuleNotFoundError, because you need to install the optional dev
dependencies.
Traceback (most recent call last):
  File "/home/u_walkews/.local/bin/textual", line 5, in <module>
    from textual.cli.cli import run
  File "/home/u_walkews/.local/pipx/venvs/textual/lib/python3.10/site-packages/textual/cli/cli.py", line 4, in <module>
    import click
ModuleNotFoundError: No module named 'click'
Pipx Inject #
In order to install optional dependencies with pipx you need to first install
the library, then inject in the optional dependencies using the square bracket
syntax.
pipx install textual
pipx inject textual 'textual[dev]'
I am working through the textual tutorial, and I want to put it in a proper cli
that I can pip install and run the command without textual run --dev app.py.
This is a fine pattern, but I also want this to work when I don’t have a file
to run.

pyproject.toml entrypoints #
I set up a new project running hatch new, and added the following entrypoint,
giving me a tutorial cli command to run.
...

[project.scripts]
tutorial = 'textual_tutorial.tui:tui'
https://waylonwalker.com/hatch-new-cli/
setup.py entrypoints #
If you are using setup.py, you can set up entrypoints in the setup command.
from setuptools import setup

setup(
    ...
    entry_points={
        "console_scripts": ["tutorial = textual_tutorial.tui:tui"],
    },
    ...
)
https://waylonwalker.com/minimal-python-package/
tui.py #
adding features
Now to get devtools through a cli without running through textual run --dev.
I pulled open the textual cli source code, and this is what it does at the time
of writing.
Note: I used sys.argv as a way to implement a
--devquickly tutorial. For a real project, I’d setup argparse, click, or typer.typeris my go to these days, unless I am really trying to limit dependencies, then the standard libraryargparsemight be what I go with.
def tui():

    from textual.features import parse_features
    import os
    import sys

    dev = "--dev" in sys.argv # this works, but putting it behind argparse, click, or typer would be much better

    features = set(parse_features(os.environ.get("TEXTUAL", "")))
    if dev:
        features.add("debug")
        features.add("devtools")

    os.environ["TEXTUAL"] = ",".join(sorted(features))
    app = StopwatchApp()
    app.run()


if __name__ == "__main__":
    tui()
Other Flags??? #
If you look at the source, there is one other flag for headless mode.
FEATURES: Final = {"devtools", "debug", "headless"}
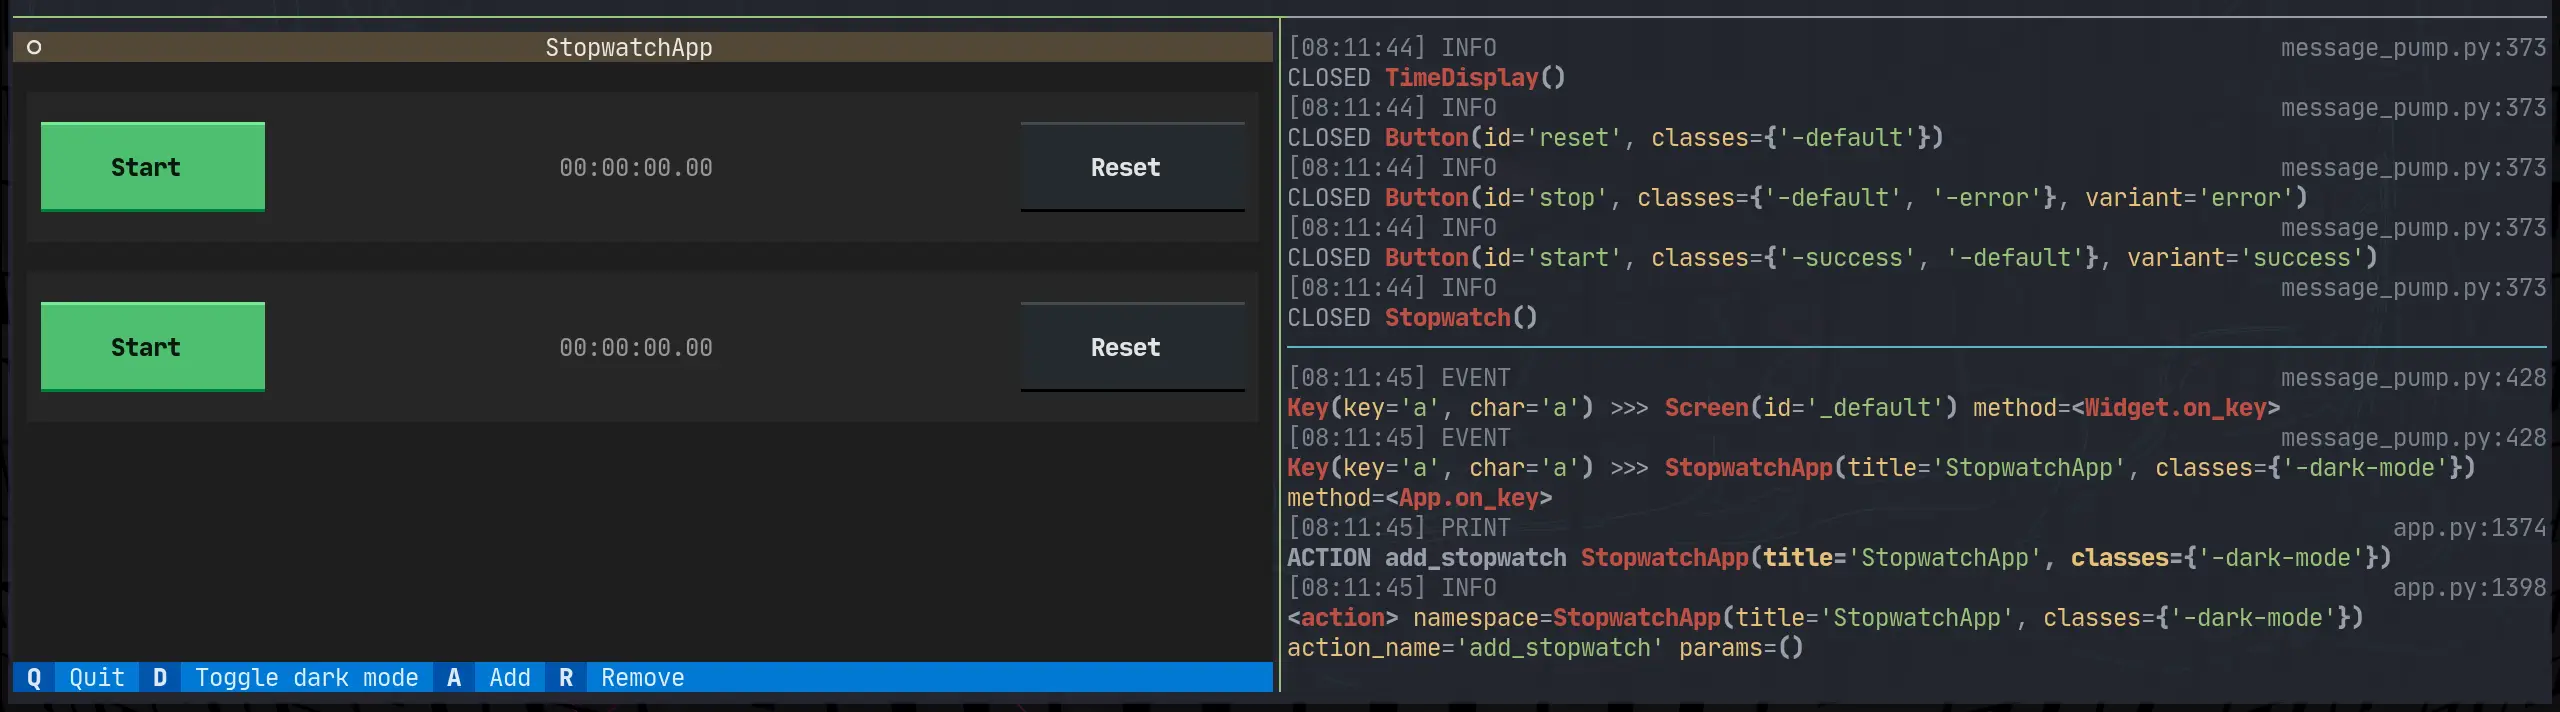
Run it #
Here it is running with tutorial --dev on the left, and textual console on
the right.
I like AnH0ang’s [1] project kedro-aim [2].
A kedro plugin that enables logging to the ml experiment tracker aim
References:
[1]: https://github.com/AnH0ang
[2]: https://github.com/AnH0ang/kedro-aim
The work on PrismLauncher [1] by PrismLauncher [2].
A custom launcher for Minecraft that allows you to easily manage multiple installations of Minecraft at once (Fork of MultiMC)
References:
[1]: https://github.com/PrismLauncher/PrismLauncher
[2]: https://github.com/PrismLauncher
I’m really excited about learn-cloudformation [1], an amazing project by widdix [2]. It’s worth exploring!
Learn how to use Infrastructure as Code on AWS with the help of CloudFormation.
References:
[1]: https://github.com/widdix/learn-cloudformation
[2]: https://github.com/widdix
For far too long I have had to fidget with v4l2oloopback after reboot. I’ve had this happen on ubuntu 18.04, 22.04, and arch.
After a reboot the start virtual camera button won’t work, It appears and is clickable, but never turns on. Until I run this command.
sudo modprobe v4l2loopback video_nr=10 card_label="OBS Video Source" exclusive_caps=1

Today I learned that you can turn on kernel modules through some files in /etc/modules...
This is what I did to my arch system to get it to work right after boot.
echo "v4l2loopback" | sudo tee /etc/modules-load.d/v4l2loopback.conf
echo "options v4l2loopback video_nr=10 card_label=\"OBS Video Source\" exclusive_caps=1" | sudo tee /etc/modprobe.d/v4l2loopback.conf