Inside of my [[ _copier_conf.answers_file ]].tmpl file is this, a
message not to muck around with it, and the ansers in yaml form. The
first line is just a helper for the blog post.
# ~/.copier-templates/setup.py/\[\[\ _copier_conf.answers_file\ \]\].tmpl# Changes here will be overwritten by Copier; NEVER EDIT MANUALLY[[_copier_answers|to_nice_yaml]]
Inside my copier.yml I have setup my _answers_file to point to a special
file. This is because this is not a whole projet template, but one just
for a single file.
After rendering the template we have the following content in our
.setup.setup-py-copier-answers.yml file. This will allow us to update
quick if we ever change our template.
# .setup-py-copier-answers.yml# Changes here will be overwritten by Copier; NEVER EDIT MANUALLY_src_path:/home/walkers/.copier-templates/setup.pyauthor_github:waylonwalkerauthor_name:Waylon Walkerdescription:awesomenessframework:nullkeywords:nullpackage_name:my-package
This is where I was most stuck, primarily becuase -a <answers_file>
must come exactly after the base command copier. This felt a bit odd
to and not where I expected it so it.
So the defaults are now changed to our previous results, but it keeps
asking for them. To stop asking we can simply add a -f flag.
copier -fa .setup-py-copier-answers.yml update
Once you have made your sick looking cli apps with rich, eventually you are
going to want to add some keybindings to them. Currently Textual, also written
by @willmcgugan, does this extremely well.
Fair Warning it is in super beta mode and expected to change a bunch. So take
it easy with hopping on the train so fast.
If you return your rich renderable out of class that inherits from
textual.widget.Widget, you can then dock this inside of an app class
inheriting from textual.app.App.
classMyWidget(Widget):defrender(self):my_renderable=Panel("press q to quit")returnmy_renderableclassMyApp(App):asyncdefon_mount(self)->None:awaitself.view.dock(MyWidget(),edge="top")awaitself.bind("q","quit")
At this point It probably does not look much different, but it can be
interactive by binding keys to any method on your app that starts with the word
action_, this includes the built-in actions such as action_quit.
fromtextual.appimportAppfromtextual.widgetimportWidgetfromrich.panelimportPanelclassMyWidget(Widget):defrender(self):my_renderable=Panel("press q to quit")returnmy_renderableclassMyApp(App):asyncdefon_mount(self)->None:awaitself.view.dock(MyWidget(),edge="top")awaitself.bind("q","quit")if__name__=="__main__":MyApp.run(log="textual.log")
count lines of code # [1]
pipx run pygount markata
pipx run pygount markata --format=summary
pipx run pygount markata --suffix=cfg,py,yml
References:
[1]: #count-lines-of-code
I’ve been stuck many times looking at a vim buffer with little question
marks at the beginning of each line and trying to get rid of them. for
so long I didn’t know what they were so trying to get rid of them was
impossible.
It turns out they are tabs, and you can get rid of the little leading
question marks with this substitution command.
:%s/\t/ /g
tmux popups can be sized how you like based on the % width of the
terminal on creation by using the flags (h, w, x, y) for height, width,
and position.
I was completely stuck for awhile. copier was not replacing my template
variables. I found out that adding all these _endops fixed it. Now
It will support all of these types of variable wrappers
!RTFM: Later I read the docs and realized that copier defaults to using [[
and ]] for its templates unlike other tools like cookiecutter.
I’ve been looking for a templating tool for awhile that works well with
single files. My go to templating tool cookiecutter does not work for
single files, it needs to put files into a directory underneath of it.
By default copier uses double square brackets for its variables.
variables in files, directory_names, or file_names will be substituted
for their value once you render them.
# hello-py/hello.py.tmplprint('hello-[[name]]')
note! by default copier will not inject variables into your
template-strings unless you use a .tmpl suffix.
Before running copier we need to tell copier what variables to ask for,
we do this with a copier.yml file.
# copier.ymlname:default:my_nametype:strhelp:What is your name
I prefer to install cli tools that I need globally with pipx, this
always gives me access to the tool without worrying about dependency
conflicts, bloating my system site-packages, or managing a separate
virtual environment for it myself.
The resulting files will have your variables injected into them if you have
setup your template and copier.yml up correctly.
print('hello-you')
I just installed a brand new Ubuntu 21.10 Impish Indri, and wanted a
kedro project to play with so I did what any good kedroid would do, I
went to my command line and ran
pipx run kedro new --starter spaceflights
But what I got back was not what I expected!
Fatal error from pip prevented installation. Full pip output in file:
    /home/walkers/.local/pipx/logs/cmd_2022-01-01_20.42.16_pip_errors.log

Some possibly relevant errors from pip install:
    ERROR: Could not find a version that satisfies the requirement kedro (from versions: none)
    ERROR: No matching distribution found for kedro
Error installing kedro.
This is weird, why cant I run kedro new with pipx? Lets try pip.
pip install kedro
Same issue.
ERROR: Could not find a version that satisfies the requirement kedro (from versions: none)ERROR: No matching distribution found for kedro
The issue is that kedro only runs on up to python 3.8, and on Ubuntu
21.10 when you apt install python3 you get python 3.9 and the
standard repos don’t have an old enough version to run kedro.
Pluggy makes it so easy to allow users to modify the behavior of a framework
without thier specific feature needing to be implemented in the framework
itself.
I’ve really been loving the workflow of frameworks built with pluggy. The first
one that many python devs have experience with is pytest. I’ve never created a
pytest plugin, and honestly at the time I looked into how they were made was a
long time ago and it went over my head. I use a data pipelining framework
called kedro, and have build many plugins for it.
As long as the framework document the hooks that are available and what it
passes to them it’s so easy to make a plugin. Its just importing the
hook_impl, making a class with a function that represents one of the hooks,
and decorating it.
At the time I started playing with pluggy, their docs were less
complete, or I was just plain blind, but this was a huge part of the
docs that were missing for me that now actually appear to be there. But
to get some more examples out there, here is my version.
importpluggy# These don't need to matchHOOK_NAMESPACE="pluggy_example"PROJECT_NAME="pluggy_example"hook_spec=pluggy.HookspecMarker(HOOK_NAMESPACE)hook_impl=pluggy.HookimplMarker(HOOK_NAMESPACE)classPluggyExampleSpecs:"""
This is where we spec out our frameworks hooks, I like to refer to them as
the lifecycle. Each of these functions is a hook that we are exposing to
our users, with the kwargs that we expect to pass them.
"""@hook_specdefstart(self,pluggy_example:PluggyExample)->None:"""
The first hook that runs.
"""pass@hook_specdefstop(self,pluggy_example:PluggyExample)->None:"""
The last hook that runs.
"""passclassPluggyExample:"""
This may not need to be a class, but I wanted a container where all the
hooks had access to the message. This made sense to me to do as a class.
"""def__init__(self,message="",hooks=None)->None:"""
Setup the plugin manager and register all the hooks.
"""self._pm=pluggy.PluginManager(PROJECT_NAME)self._pm.add_hookspecs(PluggyExampleSpecs)self.message=messageself.hooks=hooksifhooks:self._register_hooks()def_register_hooks(self)->None:forhookinself.hooks:self._pm.register(hook)defrun(self):"""
Run the hooks in the documented order, and pass in any kwargs the hook
needs access to. Here I am storing the message within this same class.
"""self._pm.hook.start(pluggy_example=self)self._pm.hook.stop(pluggy_example=self)returnself.messageclassDefaultHook:"""
These are some hooks that run by default, maybe these are created by the
framework author.
"""@hook_impldefstart(pluggy_example):pluggy_example.message=pluggy_example.message.upper()@hook_impldefstop(pluggy_example):print(pluggy_example.message)if__name__=="__main__":"""
The user of this framework can apply the hook in their own code without
changing the behavior of the framework, but the library has
implemented it's own default hooks.
"""pe=PluggyExample(message="hello world",hooks=[DefaultHook,],)pe.run()
Now Lets pretent the user of this library likes everything about it,
except, they don’t like all the shouting. They can either search for a
plugin on Google, github, or pypi and find one, or make it themself. the
magic here is that they do not need to have the package maintainer patch
the core library itself.
class LowerHook:
    """
    This is a new hook that a plugin author has created to modify the behavior
    of the framework to lowercase the message.
    """
    @hook_impl
    def start(pluggy_example):
        pluggy_example.message = pluggy_example.message.lower()

from pluggy_example import PluggyExample
pe = PluggyExample(
    message="hello world",
    hooks=[
        DefaultHook,
        LowerHook
    ],
)
pe.run()
Here is a short clip of me running the pluggy example in it’s default
state, then adding the LowerHook, and running a second time.
One of the most useful skills you can acquire to make you faster at
almost any job that uses a computer is getting good at finding text in
your current working diretory and identifying the files that its in. I
often use the silver searcher ag or ripgrep rg to find files in
large directories quickly. Both have a sane set of defaults that ignore
hidden and gitignored files, but getting them to list only the filenames
and not the matched was not trivial to me.
I’ve searched throught he help/man pages many times looking for these
flags and they always seem to evade me.
Passing the flag -l to ag will get it to list only the filepath, and
not the match. Here I gave it a --md as well to only return markdown
filetypes. ag supports a number of filetypes in a very similar way.
Giving rg the --files-with-matches flag will yield you a similar set
of results, giving only the filepaths themselves and not the match
statement. Also passing in the -g "*.md" will similarly yield only
results from markdown files.
rg --files-with-matches you -g "*.md"
pyenv provides an easy way to install almost any version of python from
a large list of distributions. I have simply been using the version of
python from the os package manager for awhile, but recently I bumped my
home system to Ubuntu 21.10 impish, and it is only 3.9+ while the
libraries I needed were only compatable with up to 3.8.
I needed to install an older version of python on ubuntu
I’ve been wanting to check out pyenv for awhile now, but without a
burning need to do so.
Based on the Readme it looked like I needed to install using homebrew,so this
is what I did, but I later realized that there is a pyenv-installer repo that
may have saved me this need.
You can list all of the available versions to install with
pyenv install --list. It does reccomend updating pyenv if you suspect
that it is missing one. At the time of writing this comes out to 532
different versions!
Running pyenv local will set the version of python that we wish to use
while in this directory and any directory underneath of it while using
the pyenv command.
I immediately ran into the same issue I was having before when trying to
run pipx, as pipx was running my system python. I had to install pipx
in the python3.8 environment to get it to use it.
pyenv exec pip install pipx
pyenv exec pipx run kedro new
When I open a terminal and call python its still my system python that
I installed and set with update-alternatives. I am not sure if this is
expected or based on how I had installed the system python previously,
but it’s what happened on my system.
To make a virtual environment, I simply ran pyenv exec python in place
of where I would normally run python and it worked for me. There is a
whole package to get pyenv and venv to play nicely together, so I
suspect that there is more to it, but this worked well for me and I was
happy.
Now when my virtual environment is active it points to the python in
that virtual environment, and is the version of python that was used to
create the environment.
Installing brew on linux proved quite easy and got pyenv running for me
within 4 commands.
I had never used homebrew before, honestly I thought it was a mac only
thing for years. Today I wanted to try out pyenv, and the reccommended
way to install was using homebrew. I am not yet sure if I want either
in my normal workflow, so for now I am just going to pop open a new
terminal and install homebrew and see how it goes.
When I first moved to vim from and ide like vscode or sublime text one of my
very first issues was trying to preview my website at localhost:8000. There
had always just been a button there to do it in all of my other editors, not
vim. There are not many buttons for anything in vim. While there is probably a
plugin that can run a webserver for me in vim, it’s not necessary, we just need
the command line we are already in.
You will need a way to run another process alongside vim, here are a couple
ideas to get you going that are not the focus here.style
use background jobs
c-z to send a job to the background
fg to bring it back
use a second terminal
use a second tab
use tmux and run it in a separate split/window
use an embeded nvim terminal
running a development webserver from the command line #
Python already exists on most linux systems by default, and most are now on
python3. If you are on windows typing python will take you directly to the
windows store to install it, or you can also use wsl.
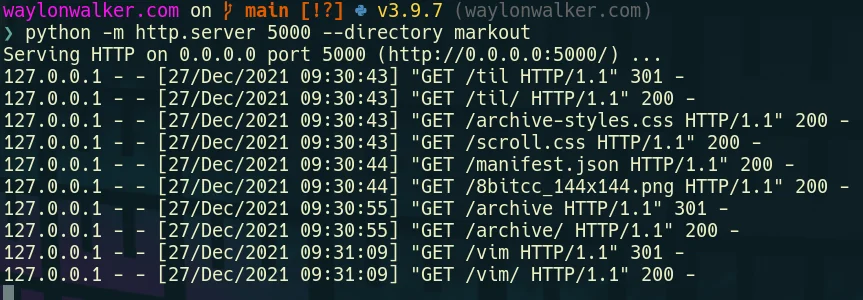
# python3python -m http.server
# running on port 5000python -m http.server --directory markout 5000
# for the low chance you are on python2
python -m SimpleHTTPServer

# running on port 5000
python -m SimpleHTTPServer 5000
python -m SimpleHTTPServer --directory markout 5000
If you are a web developer it’s likely that you need nodejs and npm on your
system anyways and may want to use one of the servers from npm. I’ll admit with
these not being tied to the long term support of a language they are much more
feature rich with things like compression out of the box. In my opinion they
are nice things that you would want out of a production server, but may not
be necessary for development.
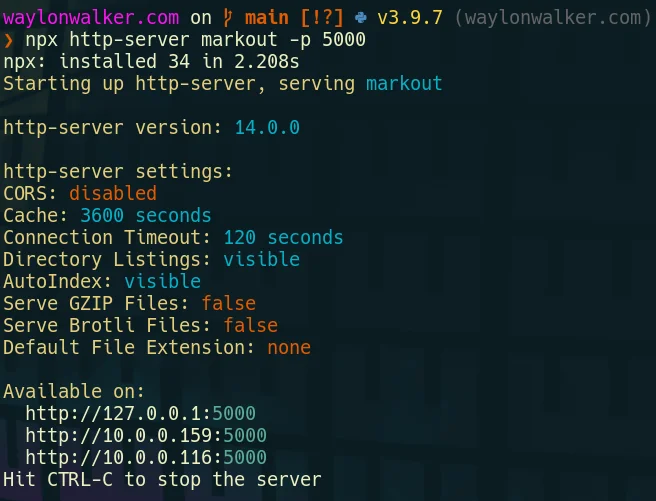
npx is a handy tool that lets you run command line applications straight from
npm without installing them. It pulls the latest version every time you want
to run, then executes it without it being installed.
npx http-server
# running on port 5000npx http-server -p 5000npx http-server markout -p 5000
Many command line tools can output a list of files, this is quite powerful.
I often want to search for something, then open it from a fuzzy picker. This
can be done with fzf in the terminal, but often I am already in vim and I want
to open it inside my current session.
Telescope is the fuzzy file finder I use every day inside of neovim. Its pretty
fantastic and easy to extent like this. This first example I am only passing in
files from the current working directory by using ls.
:Telescopefind_filesfind_command=ls
This brings up a normal Telescope picker with results from the ls command.
Adding more arguments can be done by comma separating them as shown in the
example below. This command will run the silver-searcher, search for all
occurences of nvim inside of a markdown file, and return only the filepaths so
Telescope can pick from them.
:Telescopefind_filesfind_command=ag,nvim,--md,-l
Finding hidden files using Telescope as you fuzzy file finder is not too
hard, its a single flag passed in. Then it will use whichever file
finder it can find [‘fd’, ‘fdfind’, ‘rg –files’, ‘find’, or ‘where’] in
that order. These tools each have their own way of handling hidden
files, but telescope takes care of that so all you need to do is pass in
hidden=true.
I have this keymap set to help me list out all files including hidden
files using the pnumonic go edit hidden. I use ge for quite a few
different things to take me directly to a specific file or picker.
Lately I’ve been on a journey to really clean up my dotfiles, and I was
completely missing fonts. I noticed jumping into a new vm I had a bunch
of broken devicons when using Telescope with the devicons plugins.
This is one of those things that can be a total pain to get right on
some systems, and it’s so nice when it’s just there for you pretty much
out of the box.
make sure your user fonts directory exists
chech if the font you want exists on your machine
download and unzip fonts into the fonts directory
repeat 2-3 for all the fonts you use on your system
Part of my neovim setup requires having the black python formatter
installed and callable. I install it with pipx so that I don’t have
to manage a virtual environment and have it available everywhere. So
far this works well for me, if there are ever breaking changes I may
need to rethink this.
re-installing a bunch of things that are already installed can be quite
a waste and really add up to my ansible run time, so for most of my
ansible tasks that install a command like this I have been following
this pattern.
check if the command is installed with command -v <command>
register that step
ignore if that step fails
add a when: <xxx>_exists is failed condition to the step that
installs that command.
- name:check is black installedshell:command -v blackregister:black_existsignore_errors:yes- name:install blackwhen:black_exists is failedshell:pipx install black
I made a video based on this post, check it out if its your thing
Adding a __render__ method that returns a rich renderable to any python class
makes it display this output if printed with rich. This also includes being
nested inside a rich Layout.
Fugitive comes with a pretty sick way to commit files and see the diff at the
same time with verbose commit. Opening the fugitive menu with :G brings up
your git status, you can stage files with s, unstage them with u, toggle
them with -, and toggle their diff with >. Once you have staged your files
for commit, you can commit with cc, but today I found that you can commit
verbose with cvc. This brings up not only a commit widow with your git
status shown, but the diff that you are about to commit.